






You know the smell before you see the stain. A child’s booster seat has been in and out all week, the gym bag’s been living on the back bench, or a coffee spill dried into the driver’s bolster and now the cabin just feels off. A quick vacuum makes the seats look tidy, but it doesn’t reset the fabric, and it definitely doesn’t deal with the oils, sweat, and food residue sitting down in the fibres.
That’s where a proper seats steam clean earns its keep. Used with the right heat, pressure, and drying discipline, steam can sanitise fabric, lift embedded grime, and cut the stale smell that keeps coming back after a surface clean. Used badly, it just makes seats damp and creates the same odour problem all over again.
Why Car Seats Need Steam and Not Just a Vacuum?
A vacuum handles loose debris well. It pulls out sand, crumbs, pet hair, and the bits you can see at a glance. What stays behind is the part that causes trouble in Perth cabins, the body oils, sweat, drink residue, and food contamination that have already worked into the weave.
What steam does that dry cleaning can’t
Steam combines heat, controlled moisture, and surface agitation, and that changes the result completely. In the verified data, steam cleaning at about 212-240°F with at least 55 PSI is reported to liquefy oils, denature proteins, and kill 99.9% of bacteria, mold spores, and dust mites without chemicals. That matters on fabric car seats because the hygiene problem goes beyond what you can see. It is biological, especially when humidity leaves residue sitting longer than it should in the cabin how steam cleaning works on car seats.
That is also why the label on the machine matters less than the output at the fabric. A weak unit can make a seat look refreshed for photos and still leave enough residue for the odour to come back. A proper steam clean depends on pressure, heat, dwell time, and immediate lift-off, not a cosmetic pass that smells better for an afternoon.
Practical rule: if the seat smells bad after vacuuming, the problem is not dust. It is what is bonded to the fibres.
Why the odour comes back
Odour return is common in interiors that have been called steam cleaned. A survey cited in the verified source found 68% of interiors labelled as “steam cleaned” came back within 6 weeks for smell recurrence, and the source linked that to machines running below 50 PSI or to incorrect dwell time. That lines up with what you see in the bay. The seat surface looks clean, but the fibres were never hit hard enough to reset them.
Perth heat makes that gap show up fast. Moisture, sweat, and spilled food stay active in the foam if the cleaning pass was too light, and the smell returns even when the fabric looks fine. Steam is not magic. It works when the machine has enough pressure, the nozzle stays moving, and the residue is removed instead of just warmed up.
For seats that also trap pet hair deep in the weave, a vacuum alone barely touches the problem. A proper pass needs the hair lifted first, then the steam can reach the oils and contamination underneath. If the cabin has heavier pet build-up, the seat prep issues overlap with the same extraction problems you see in pet hair removal for cars.
What to Check Before You Pull Out the Steam Cleaner?
Preparation decides whether the job finishes cleanly or turns into a damp mess. A lot of DIY jobs fail before the steam even starts, because the operator hasn’t removed the loose grit that gets smeared into the upholstery or checked what’s hiding under the trim. The first job is a proper vacuum, not a quick skim.
Read the seat before you touch it
Look at the upholstery by sight and feel. Fabric, leather, vinyl, perforated leather, and Alcantara all react differently to heat and moisture, and the wrong assumption is how seats get marked or over-wet. Check for airbag tags on the bolsters, heated-seat connectors, stitched seams, perforations, and child-restraint anchor areas. The best Australian guidance on interior steaming also flags electronic controls as part of the inspection, which is exactly where care matters in newer cabins Australian interior steam clean guide.
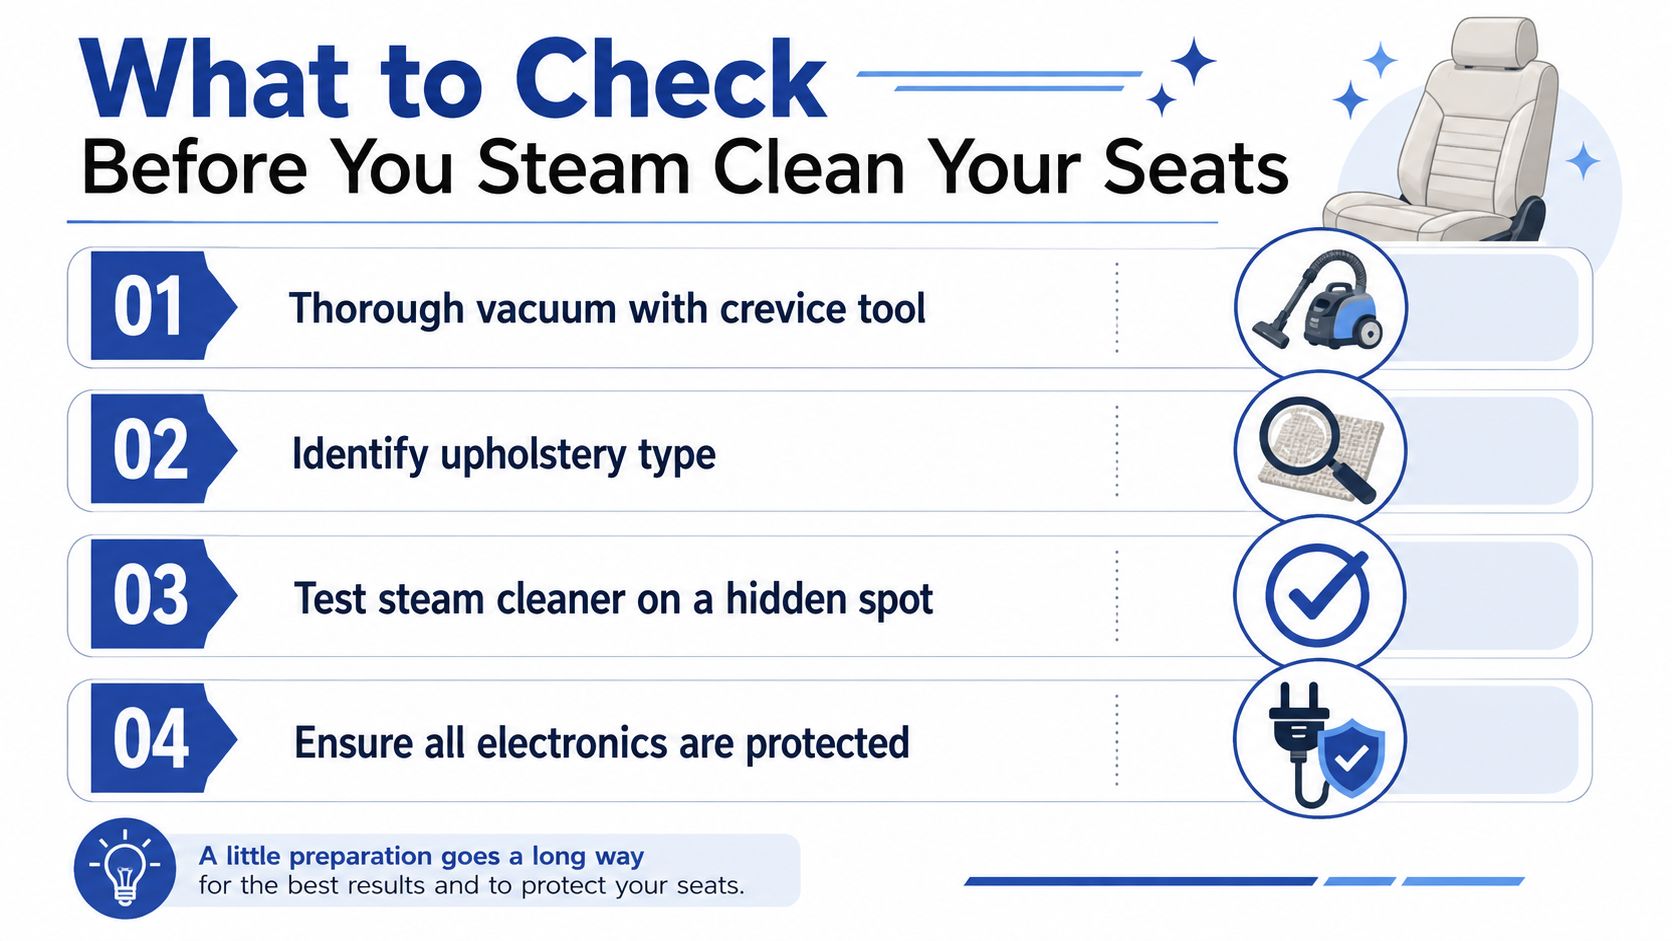
A hidden spot test is essential. If a fabric darkens too fast, or a finish changes after a short burst, you back off before doing the whole seat. Open the windows too, because ventilation helps get moisture moving as soon as the job starts.
What skipping prep actually costs
Loose grit turns into mud when steam hits it. Electronics can be a bigger problem, because moisture pushed into a connector or switch area can create a warning light that has nothing to do with the original stain. The practical cost is simple, a seat that stays damp longer, smells worse later, or needs a second pass that shouldn’t have been necessary.
Open the cabin, vacuum the seams, and check the bolsters before you think about steam. That’s the difference between a reset and a rework.
I also remove loose floor mats before I start, because they hold grit that gets dragged straight back into the cabin while you’re working. If pet hair is part of the mess, it’s worth sorting that first so the steam doesn’t turn it into a sticky layer in the weave. This pet hair guide fits neatly into that prep stage.
Picking the Right Machine and Settings for Seats
A steam cleaner can make a seat look fresh on the surface while doing very little underneath. The machine matters because seats respond to temperature, pressure, and nozzle control. Use equipment that can hold a useful hygiene range and deliver enough force for controlled passes, because weak output gives you warm moisture, not a proper clean steam cleaning performance data.
DIY steamer versus commercial detailing unit
| Spec | DIY Multi-Purpose Steamer | Commercial Detailing Unit |
|---|---|---|
| Pressure | Often the weak point, and underpowered machines are linked to repeat odour problems | Better suited to the pressure needed for seat fibres |
| Heat | Can be adequate, but not always stable under load | More consistent for repeated interior work |
| Nozzle control | Usually basic attachments | Better control over short, precise passes |
| Hose and reach | Fine for a small car, awkward in larger cabins | More practical across front and rear seats |
| Drying discipline | Depends heavily on the operator | Better match for controlled work and repeated use |
A basic home unit can still handle a single fabric seat if you work slowly and keep your passes tight. Once you move into multiple seats, heavier contamination, or a family vehicle that gets regular mess, the case for a commercial detailing unit gets much stronger. Perth heat can make drying look easier than it is, but trapped moisture still drives odour return and that under-pressure problem shows up fast in interiors that were only steamed on the surface. The broader equipment market also shows this work is still growing, with global steam cleaner market analysis from Technavio pointing to steady demand across regions.
What to look for on the spec sheet
Ignore shiny wattage claims if the machine cannot hold pressure on the fabric. You want a nozzle that gives a tight, controlled stream, not a wide blast that wets more area than it cleans. Tank size matters for workflow too, because stopping to refill in the middle of a seat slows the job and increases the chance of overworking one patch.
Practical rule: if the machine cannot stay hot and forceful enough for short, controlled passes, it dampens seats rather than cleaning them.
The trade-off for stepping up is real. Better units are louder, bulkier, and more expensive, but they also reduce the odds of leaving a seat that smells again a few weeks later. On a car interior, that is usually the better call. For leather trim that needs a more careful follow-up after steaming, a proper clean and condition process matters just as much as the machine choice.
How to Steam Each Type of Seat Without Damaging It?
Fabric, leather, vinyl, and perforated surfaces all need different hand control. The mistake I see most often is treating every seat like plain cloth, then wondering why the finish changed or the moisture sat in the wrong place. Use short overlapping strokes, keep the nozzle around 5-10 centimetres off the surface, and keep each patch to about 3-5 seconds of exposure before you blot.
Fabric and cloth seats
On cloth, the goal is to warm and lift, not soak. Move in short overlapping strokes, then blot immediately with a clean towel so the loosened residue leaves the seat instead of drying back into it. If the fabric goes darker and stays dark, that’s a sign you’ve used too much moisture in one area.
A rear bench used by kids usually needs the most patience because the contamination sits deeper and spans more than one type of mess. Vacuum first, steam in small patches, and keep the towel folded to a clean face so you’re lifting instead of smearing. If the seat is heavily marked, a deeper interior reset can be the cleaner option, and this service guide is useful where leather and mixed trim need more careful handling.
Leather and perforated leather
On a daily commuter’s leather driver’s seat, be gentler than you would be on cloth. Keep the steam moving, use a very short dwell, and wipe straight away. Leather doesn’t like sitting wet, and the wrong approach leaves spotting or a dry finish that looks tired when the seat dries.
Perforated leather is where caution becomes discipline. The holes can trap moisture, so light passes only, no lingering, and no flooding the surface around bolsters or stitched channels. If the perforations darken, back off immediately. That’s your warning sign that moisture is collecting where it shouldn’t.
Vinyl and Alcantara
Vinyl is more forgiving, but seams and stitched edges still deserve respect. Use the same short passes, then wipe dry before moving on. Alcantara needs an especially light touch because it can look patchy if you overwork it, so the towel should do most of the finishing, not the steam alone.
Practical rule: the seat should end up damp, not soaked, and the towel should be doing real work after every pass.
The safest way to adapt on the fly is to lift the headrest and check what’s underneath before you assume the same material runs across the whole seat. Modern interiors mix surfaces more often than older ones, and that’s where operators get caught out.
Stain Tactics That Actually Work With Steam
Steam helps with the right stain and makes the wrong one worse. The first question I ask is what kind of contamination I’m dealing with, because protein, oil, dye, and grit all behave differently under heat. That diagnosis decides whether steam comes first, or later, or not at all.
Protein, oil, dye, and mud
Protein stains, such as sweat, milk, and blood, need pre-treatment before heat touches them. The verified guidance is clear on this point, never steam a protein stain without pre-treatment, because heat can set the contamination deeper into the fibres car-seat steaming guidance. Oil-based marks, like skin oils and food grease, usually respond better once the surface grime has been loosened. Dye transfer from drinks or other coloured spills is trickier, because you often need to lift the surrounding residue without driving the colour further in.
Mud and sand are different again. Vacuum them dry first. If you hit them with steam too early, you just make paste and work it into the weave. That’s the kind of mistake that looks harmless while the seat is wet and annoying a day later when it has dried patchy.
What not to do
Do not scrub wet fabric. It flattens fibres and spreads the residue. Use the towel to blot and lift, then repeat if needed. If residue keeps returning to the towel, you’re still extracting, which is a good sign. If the towel stays clean but the mark remains, the stain is probably chemically bonded and needs a different approach.
On really stubborn marks, a light extraction rinse after steaming can still make sense, but only if the seat construction can handle the extra moisture and you’ve got the drying time to match. In other words, steam is one part of the answer, not a licence to flood the seat and hope.
Drying and Deodorising Without Trapping Moisture
Perth can give you one of the worst combinations for an interior job, damp mornings and hot afternoons. A seat that’s been steamed properly still needs the right drying window, or the moisture just sits in the foam and creates a new smell later. Drying is part of the clean, not an afterthought.
Realistic drying times by material
| Seat Material | Typical Dry Time | What Speeds It Up |
|---|---|---|
| Fabric | 4-8 hours to dry completely, based on the independent guide cited in the verified data | Open doors, fans, and good cabin airflow |
| Leather | 1-2 hours | Immediate wiping and ventilation |
The 4 to 8 hour range for fabric and 1 to 2 hours for leather come from an independent how-to source, and they’re a useful guide for anyone asking whether same-day use is realistic drying guidance. In practice, I still treat the cabin as live until a touch test says the seat is dry, not just cooler on the surface.
What to do after the machine goes away
Crack the windows, run the cabin fan on fresh air, and keep the vehicle in the shade if the sun is going to overheat one side of the cabin unevenly. Blotting immediately after each pass matters because it removes water before it has time to settle into the foam. If a seat still feels cool and damp after an hour, it needs more airflow, not more steam.
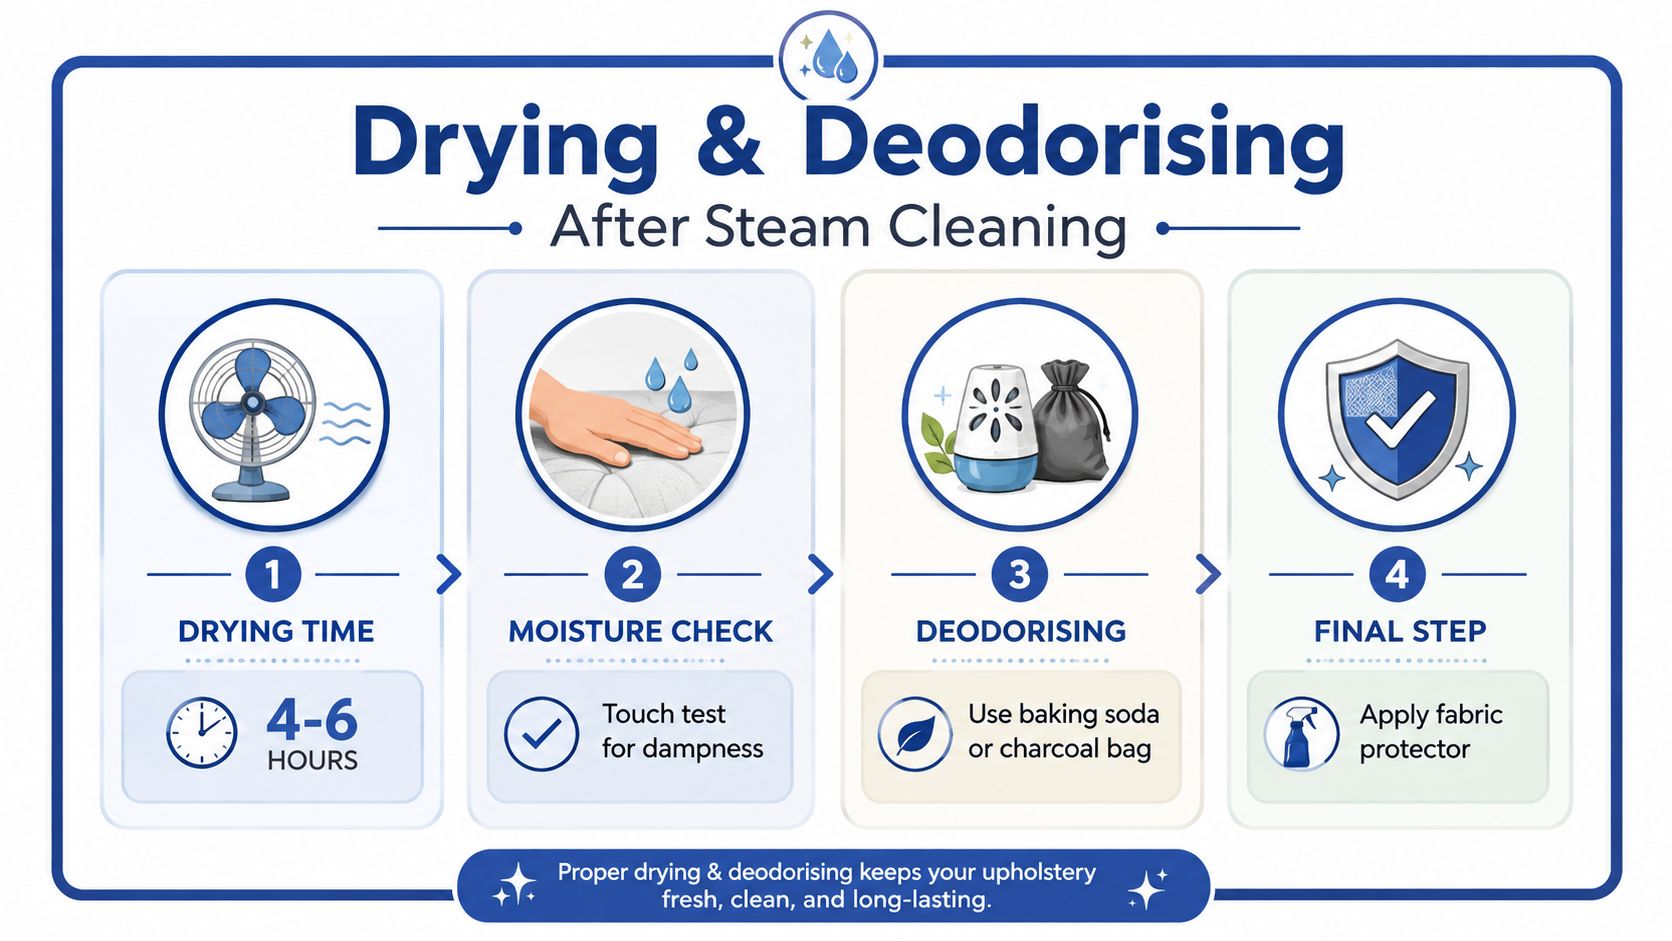
For a protection step after drying, an interior protectant can help keep the fabric easier to maintain on the next visit, and this interior protectant guide gives a practical overview of how that fits into routine care. Deodorising also works better once the seat is dry, because you’re treating the cabin air and fibres, not sealing moisture under a fragrance.
If you can smell damp fabric after the clean, the job isn’t done yet.
When Steam Cleaning Is the Wrong Call and a Pro Makes More Sense?
A home steam cleaner has clear limits. Heated seats with hidden electronics, perforated leather with visible wear, airbag-tagged bolsters, and cabins with mould from a leak all carry more risk than a small unit is built to handle. If the smell is coming from moisture that has worked into the foam, steam alone will not fix it.
Three questions that stop bad DIY decisions
Ask whether there’s an airbag tag on the seat. Ask whether there are heated-seat elements under the fabric. Ask whether the smell is a stain issue or a deeper moisture problem. If the answer points to electronics, trapped moisture, or mould, stop there and get the interior assessed properly.
Professional detailing changes the result because it can match the method to the seat and the fault. A proper interior service can combine pre-treatment chemistry, extraction drying, and an interior protectant instead of relying on steam alone, and the right setup is explained in this guide to how car interior steam cleaning works and what it costs. Prime Shine Hand Car Wash in Westminster lists seats/carpet steam clean as an add-on, along with related interior services such as leather clean and condition and interior protectant, which suits drivers who want the cabin reset without guessing at the method.
When the risk outweighs the convenience
A home unit is a fair option for straightforward fabric seats with light to moderate contamination and time to dry. It is a poor choice when the cabin has moisture damage, when the seat is tightly packed with electronics, or when you cannot afford to have the car out of service for the drying window. Perth families, rideshare drivers, and lease-return owners usually feel that trade-off first.
If you want the cabin reset properly, book a full interior clean with a team that handles seats, carpets, and drying as one job, not three separate guesses. Visit Prime Shine Hand Car Wash to check the current interior detailing options and book a time that suits your schedule.