






A machine polisher on contaminated paint is an expensive way to learn what clay bar treatment is. The pad picks up the grit that washing missed and works it into the clear coat while it corrects.
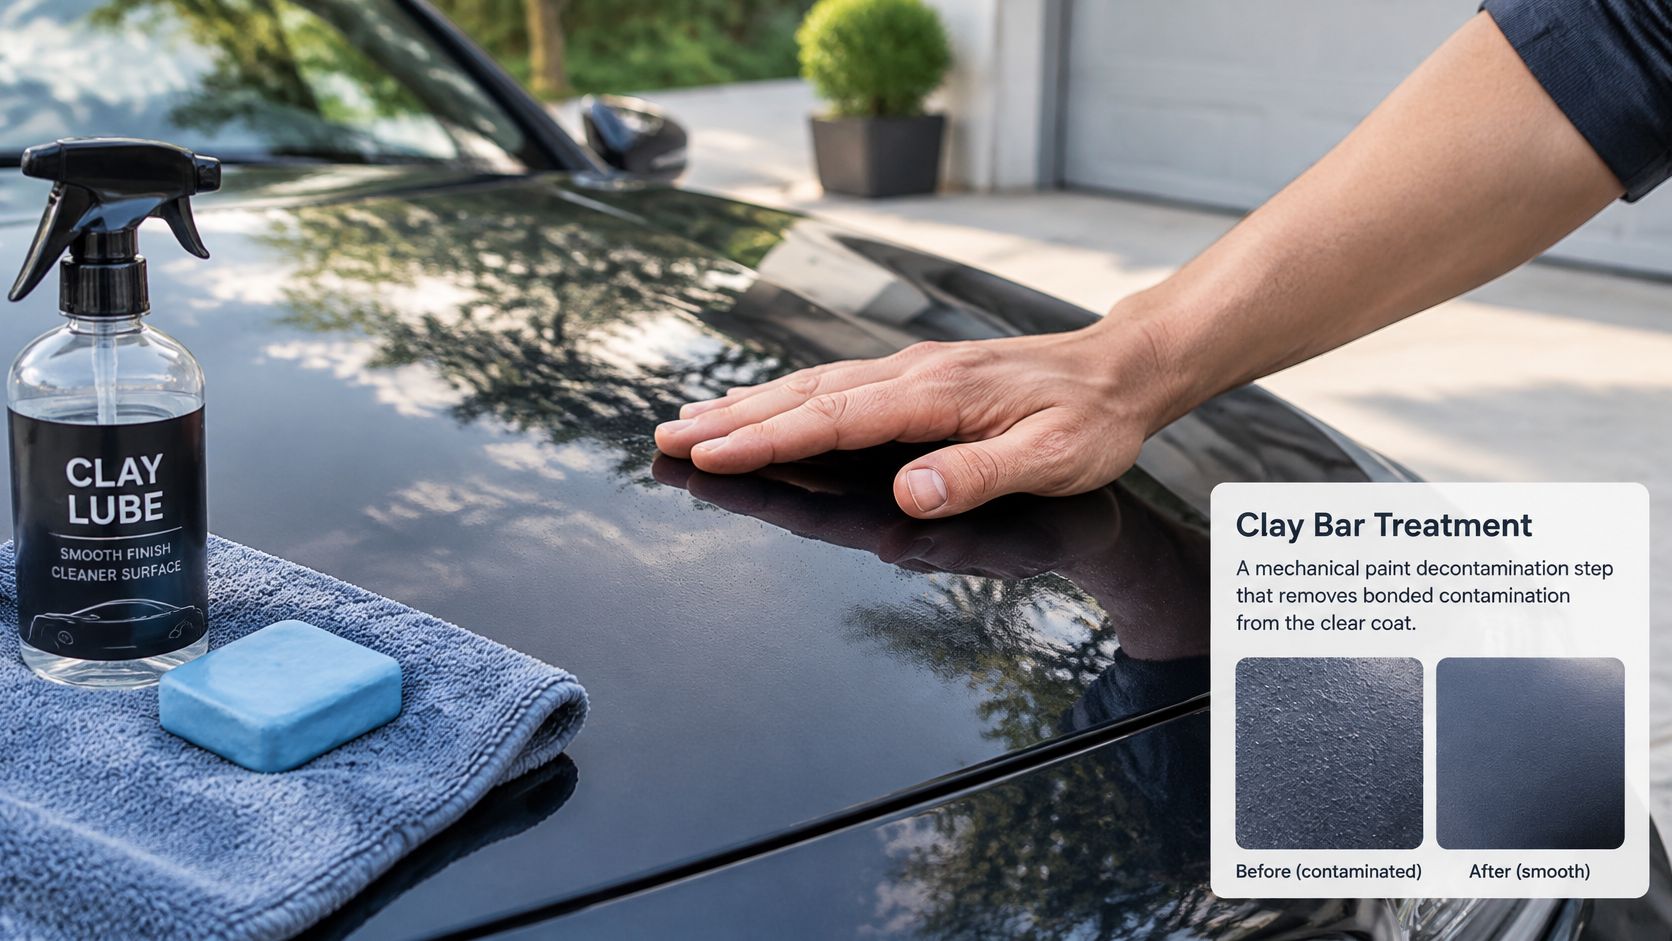
Clay bar treatment is a mechanical decontamination step performed after washing and drying. A resin or synthetic-rubber clay, glided over a dedicated lubricant, lifts bonded particles off the surface. Clay is a decontamination step, not a shine product.
That order matters. Wash first, decontaminate second, then decide whether the paint needs polishing or a protective finish. Skipping the middle step, or reaching for a stronger shampoo, leaves the same bonded layer sitting under whatever you apply next.
If a second proper wash changes nothing, stop rewashing and decontaminate the bonded layer first.
What Does Clay Bar Treatment Actually Do?
The car is dry. From the driveway it looks clean. Run your hand over the bonnet and the clear coat still drags, faintly gritty, as if fine dust never left.
Clay bar treatment is that next pass. After washing and drying, you lubricate a clay bar and glide it across the clear coat so its resin or synthetic-rubber matrix can lift particles that stayed bonded. It shears them off. It does not dissolve them, and it does not level the paint.
Think of a floor. Sweeping, which is washing, clears loose dust. Gum stuck to the boards has to be scraped off. Clay is that scrape, done wet and with almost no pressure.
A Sonax clay bar guide lists what that matrix is meant to catch after ordinary shampooing.
- Industrial fallout and brake dust: iron-rich specks that bond and feel like sandpaper.
- Overspray, tar and tree sap: sticky films a wash mitt smears rather than lifts.
- Insect residue and mineral deposits: spots that harden and sit proud of the clear coat.
Wash and dry first. Use a dedicated lubricant and light, straight-line passes. Fold or knead the clay often so a clean face meets the paint. Drop it on the ground and it is finished. Trapped grit will scratch.
Clay will not remove swirl marks, scratches or oxidation. Those defects sit in the clear coat and need polishing. Heavily used daily drivers, cars kept near industry, and cars being prepared for sale or a coating gain more from the step than a car that already feels smooth.
Washing removes what sits on the paint. Clay removes what has bonded to it.
If the paint feels rough after a thorough wash, contamination is likely bonded and clay is the right tool.
Test one horizontal panel by hand before you buy a clay kit or book a correction.
See When Paint Correction Helps
Why Does Washing Leave Contamination Behind?
After a week of driving, a panel carries three layers. Loose grime sits on top, bonded contamination sits in the middle, and clean clear coat is underneath. Shampoo and rinse deal with the top layer only. Clay works on the middle one.
Why particles stick
Run a hand over a bonnet after a rainy Perth week and you often feel a film the wash left behind, with specks that make the surface feel like fine sandpaper. A particle lands, a film of water holds it, heat bakes it on, and the mitt can no longer reach it. Time is what turns dust into a bond.
That middle layer blocks the jobs people try next. Wax and sealant cannot lie evenly on a gritty panel. A polishing pad drags the same particles across the surface, so the gloss comes out patchy instead of even.
What Perth driving adds
Perth traffic keeps feeding that middle layer. A Western Australian Government roadside air-quality report identifies tyre wear, brake wear and road-dust resuspension from vehicle travel as contributors to particulate emissions in Perth.
A BITRE transport-emissions report puts motor vehicles’ share of PM10 at approximately 20% in Perth. That is airshed context, not a reading of your clear coat, and it does not set a clay date. Judge the panel by touch. Unclayed paint may feel gritty after washing. Properly clayed paint should feel smoother under clean hands or a thin plastic bag. Use lubricant and light pressure. Aggressive or dirty clay marrs the finish, and that marring then needs polishing.
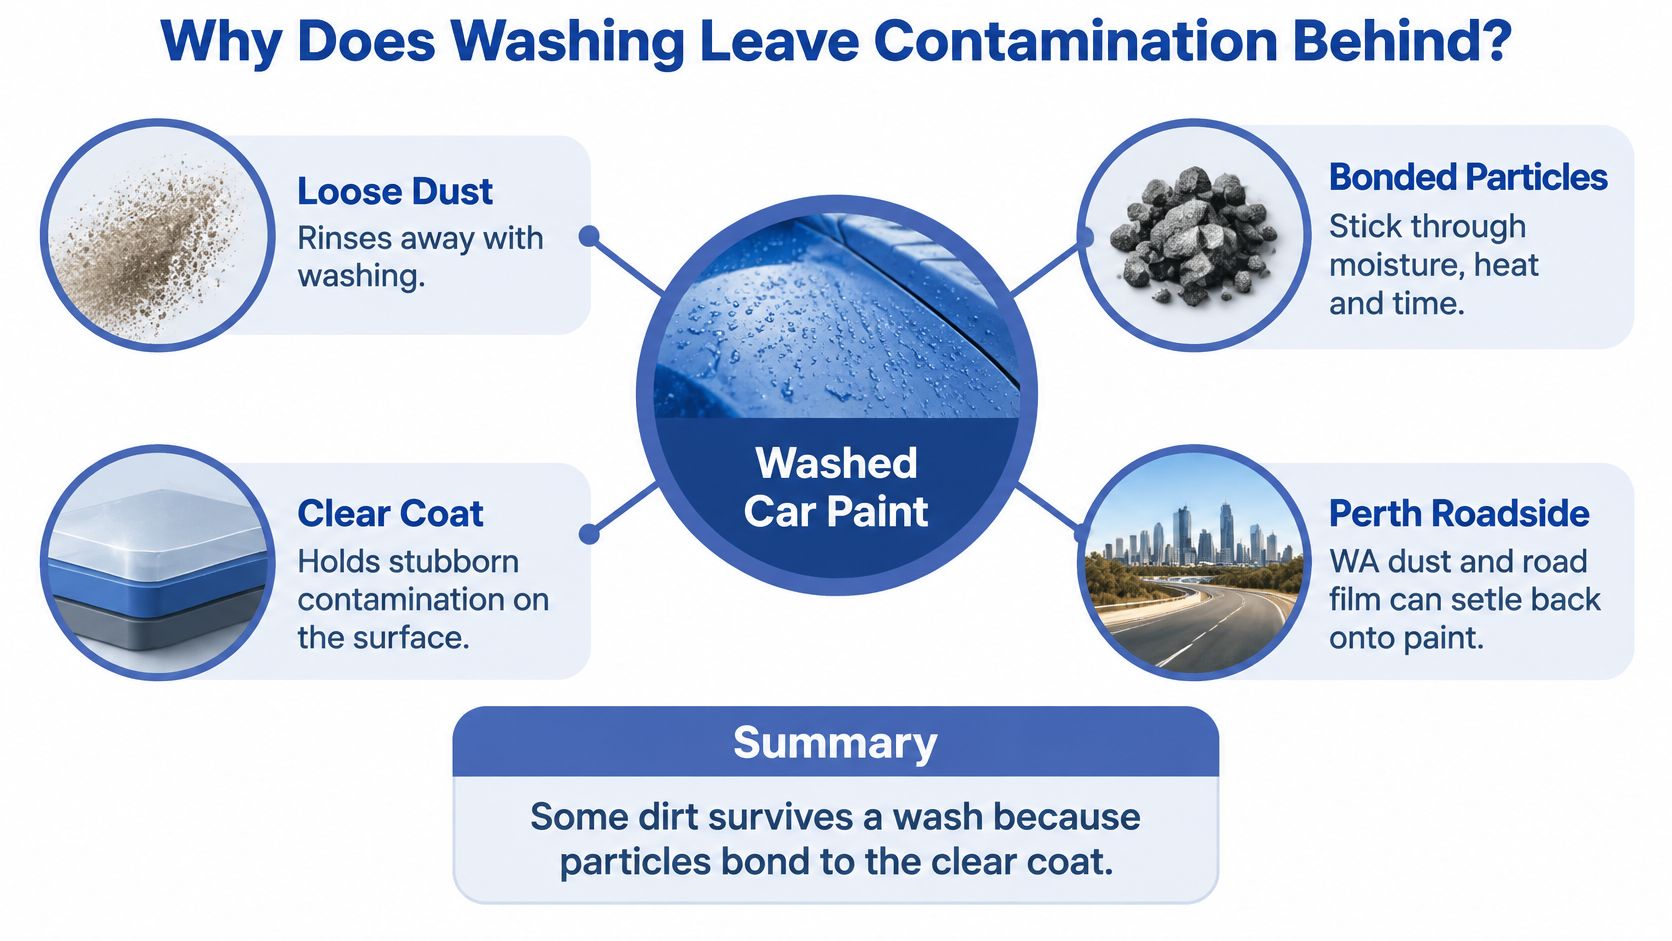
A careful outside car wash clears the loose film. The sequence after that is clay, then polish, then protect. Each layer has its own job, and skipping the middle one shows up in the finish.
Wash until the panel is clean to the eye, then trust your hand, not another round of shampoo.
How Does Clay Differ From Polishing and Coating?
Clay lifts contamination and leaves the clear-coat thickness alone. Polishing removes a thin layer of clear coat to reduce swirls and light scratches. Wax, sealant or a ceramic coating adds protection on top. Mixing those jobs up is how paint gets thinner for no gain.
Clay, polish and coating compared
| Step | Main job | Removes contamination | Changes the surface | Effect lasts |
|---|---|---|---|---|
| Wash | Removes loose dirt and road film | Loose particles only | No | Days to a week |
| Clay bar treatment | Lifts bonded particles so paint feels smooth | Yes, bonded particles | Smooths feel; can mar if misused | Until the next contamination; may strip wax |
| Machine polish | Levels clear coat to reduce swirls and light scratches | Light, through abrasion | Yes, removes a thin layer of clear coat | Defect correction is permanent; gloss needs protection |
| Wax or sealant | Adds gloss and short-term protection | No | Adds a sacrificial layer | Weeks to months |
| Ceramic coating | Adds long-term protection and water beading | No | Adds a bonded layer | Multi-year, depending on product and care |
The difference is direction. Clay pulls material off the surface. Polish takes surface material away. A coating puts a layer back on. Each one answers a different question about the panel, and none of them substitutes for another.
Clay cannot fix a swirled bonnet. The swirls are in the clear coat, and clay never cuts them out. Polishing over bonded grit does the opposite of a correction. The pad uses those particles as extra abrasive, and you trade fallout for fresh marks.
Coating has the same problem in reverse. A ceramic layer bonds to the paint it touches, so grit left underneath gets sealed in and still shows through the gloss. That is why paint correction only earns its time once the grit is gone. Clear coat is finite, so I would rather see a smooth panel with light swirls than a perfect one that lost a few microns chasing them.
Do not polish a gritty panel, and do not coat a panel you have not inspected.
Where Does Clay Fit in Paint Preparation?
Clay earns its place in the middle of the preparation chain. Run it before the wash and you grind loose dirt into the panel. Run it after polishing or protection and you undo work you just paid for. Timing is the whole job.
The six-stage order
- Wash and dry. Loose dirt has to leave before anything touches the clear coat with pressure.
- Chemically remove iron or tar where it suits the panel. Fallout and tar spots often release with a dedicated chemical before any clay is needed.
- Clay only where bonded residue remains. If a section already feels smooth, leave it. Extra passes add risk and no benefit.
- Inspect under strong lighting. Look for haze, fine trails and missed grit before you decide the paint is ready.
- Polish if swirls or light scratches are still there. Correction is optional. It is not automatic just because you clayed.
- Apply wax, sealant or ceramic coating. Protection goes on last, on a surface you have already checked.
The marring risk sits in how the clay moves, not in the clay itself. Lifted particles drag sideways across the panel, so thin lubricant, heavy pressure, a dirty clay face or an aggressive grade will leave light trails behind. Work in small sections, keep the surface wet with lubricant, use fingertip pressure only, and fold the clay to a clean face every pass or two. Drop it on the ground and it goes in the bin.
Decontamination matters most before protection. Wax, sealant and a ceramic coating all grip a bare, smooth surface better, and existing wax, sealant or polish is removed before a coating goes on so it can bond properly. Leave bonded residue in place and the coating seals contamination underneath it.
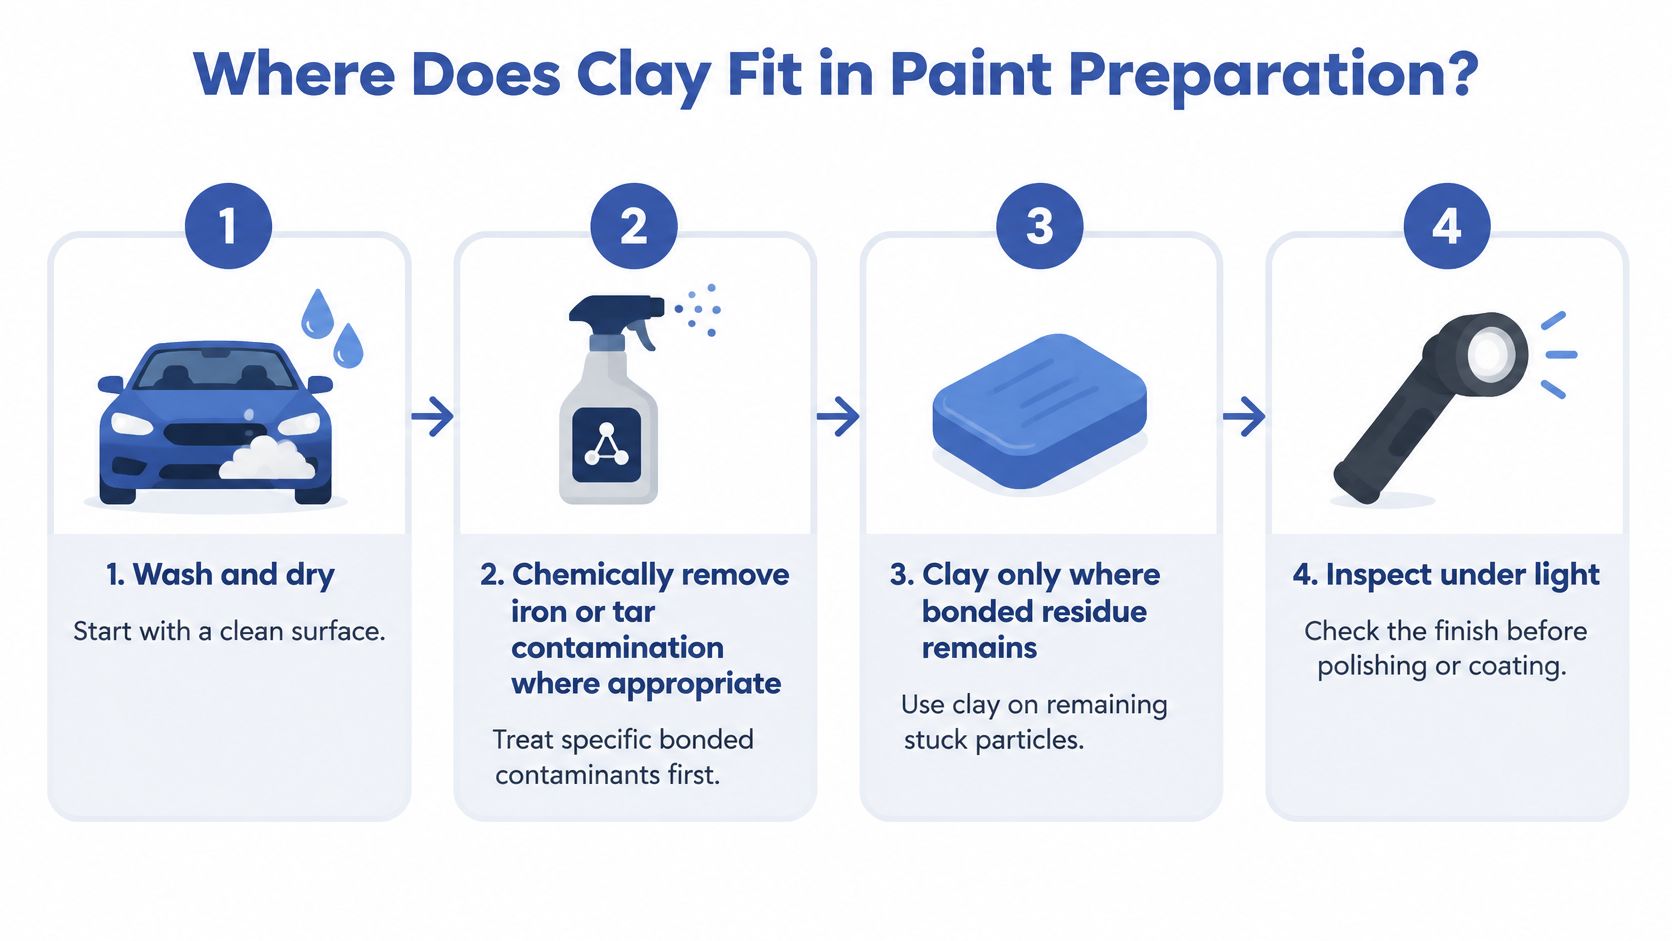
Get the sequence right and each stage builds on the last. Get it wrong and you pay twice: once for the work, once to redo it.
Clay the rough sections, inspect in hard light, then decide whether polish is actually needed.
How Often Should You Clay Your Car?
There is no set calendar for clay. For reference, a Perth daily driver is worth checking every 6 to 12 months, and a coastal or industrial car every 3 to 6 months. Treat those ranges as a prompt to test the paint.
A car parked under trees, near the coast or beside industry picks up bonded film faster than a garaged weekend car. Kilometres matter less than where the car sits. Heavy sap after a hot week, or a booking for polishing or coating, calls for clay whatever the last date was.
Clay check intervals by car condition
| Car situation | Typical check interval | Reason | Action |
|---|---|---|---|
| Daily driver in Perth suburbs | Every 6 to 12 months | Road film and fallout bond over time | Touch test at every wash |
| Garaged, low-kilometre car | Around once a year | Less airborne and road exposure | Touch test before any polishing |
| Coastal or industrial area | Every 3 to 6 months | Salt, fallout and overspray settle and bond | Touch test each wash; clay if rough |
| Parked under trees | After each heavy sap or pollen period | Sap and residue harden onto the clear coat | Remove sap chemically first, then clay if needed |
| Before machine polishing | Once, before the correction | Grit under pads causes uneven results | Clay, then inspect under strong light |
| Before ceramic coating | Once, before application | Bonded contamination stops coating adhesion | Clay, correct, then wipe down before coating |
| Before sale or lease return | Once, as part of presentation prep | Clean, smooth paint presents better | Wash, clay where rough, then polish if required |
What decides the schedule
The touch test after each wash sets the timing. Smooth paint waits. When a panel drags under your fingers, clay that section and leave the rest of the car alone. The final section of this guide covers the ten-minute touch test step by step.
Over-claying costs time and clear coat. Each pass is mild abrasion, so claying a smooth car because a few months have passed can trade clean paint for micro-marring that then needs polishing. Clay when the test says so.
Skip the fixed interval. Feel the paint after the wash and clay only the rough panels.
Should You Clay It Yourself or Hire a Professional?
Clay carries real risk if you rush it. It lifts bonded contamination that washing cannot shift, and it can leave light marring when grit is dragged across the clear coat or the lubricant runs thin. Smooth paint after a pass means the job worked. Haze means the clay went in dry or dirty.
Overspray, tree sap, tar, insect residue and embedded dirt all release from a properly lubricated panel. Thin lubricant and a contaminated clay face are what mark the finish. The test still decides where clay goes: wash, feel the paint with a clean plastic bag over your hand, treat iron or tar chemically where it suits, and clay only what remains.
DIY versus professional clay treatment
| Factor | DIY | Professional |
|---|---|---|
| Upfront cost | Clay kit, lubricant and towels; a one-off spend | Folded into paint preparation; a cut and polish package that includes clay work starts from $249 |
| Time | A few hours for a mid-size car on a first attempt | Scheduled within a wider prep job |
| Risk of marring | Higher if lubrication is thin or the clay is dirty | Lower, through experience and controlled technique |
| Finish check | Hard to judge under home lighting | Inspected under strong light before protection |
| Best for | Lightly contaminated cars and owners who enjoy the job | Heavily contaminated cars, pre-coating, pre-sale and dark paint |
A workable DIY setup
Keep the kit small and the rules strict.
- Fine-grade clay: a softer bar marks less on paint that is only lightly contaminated.
- Plenty of lubricant: the panel should stay wet for every pass. Dry clay is how haze starts.
- Clean microfibre towels: wipe each section before you judge it.
- A bright light and shade: garage light hides trails that sun shows at once.
A careful operator works small sections, folds to a clean face and stops if the paint turns hazy. That judgement is the main thing a professional adds, along with a strong-light inspection and a polish step already sequenced. Hand car detailing in Perth suits that wider job: the car is washed by hand with no machine brushes near the paint, clayed where the touch test fails, then finished under a lamp. Lightly contaminated cars on a simple wash-and-maintain routine suit DIY. Cars headed for polishing, ceramic coating, sale or a lease return usually suit a professional.
DIY the light, already-smooth cars. Hand the dark, contaminated or pre-sale cars to someone who will inspect under a lamp.
Does Your Paint Need Clay and How Do You Book It?
Book clay on three triggers. The paint feels gritty after a thorough wash. You plan to polish or coat the car. The car is going on sale or back at the end of a lease. If the paint is smooth, glossy and free of haze, keep washing and check again next time.
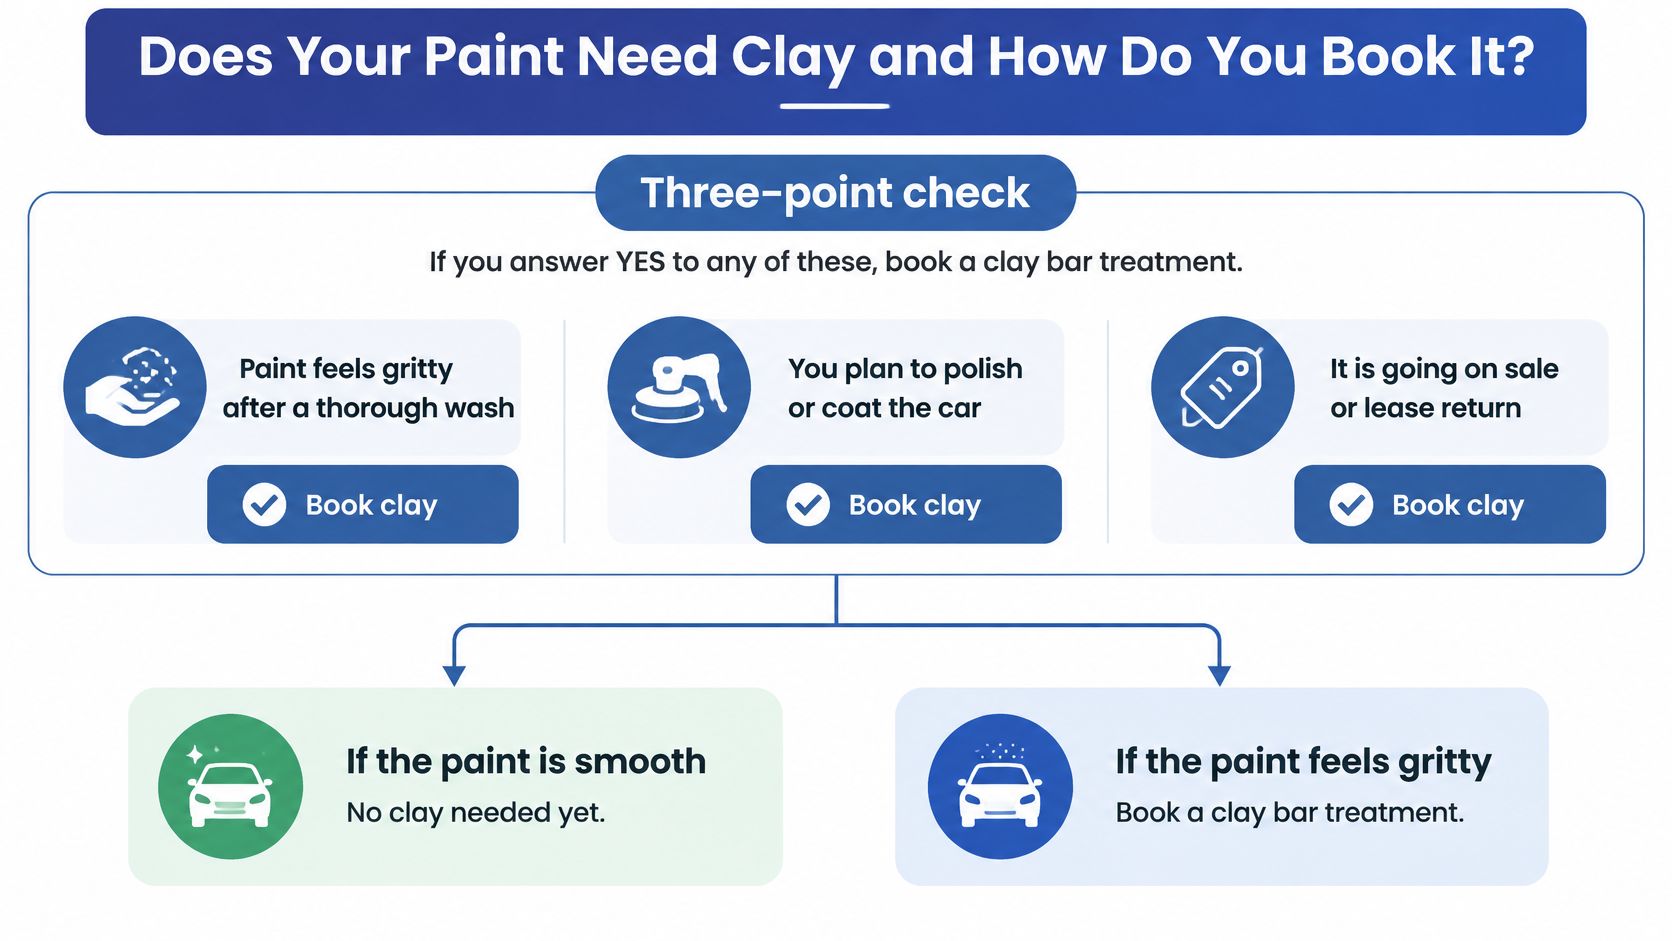
A check before you book
Wash and dry the car so loose dirt is not what you are feeling. Slide a clean plastic bag over your hand and run it across a horizontal panel, such as the bonnet or roof, then a vertical one like a door. Grit, roughness or a sandpaper drag under the bag means bonded contamination that washing has left behind. Finish by looking under strong direct light. Haze or fine marks strengthen the case, and a rough bonnet usually means the doors and boot are carrying the same load.
Rules that keep the clear coat safe
Dry clay is the usual cause of marring. Work one small lubricated section at a time with minimal pressure and straight passes. Fold the bar or rinse the pad often, so collected grit is not dragged back across the clear coat. Clay until the section feels smooth, wipe it down, and move on.
Discard any clay that hits the ground. Never clay a dry panel. Do not clay matte, satin or textured plastics. Those surfaces mark, and polishing will not put the original finish back.
One lubricated test section tells you more than claying the whole car on a hunch.
What to book
Cut & Polish starts from $249 and includes an exterior wash, clay bar or paint preparation, and machine cut and polish. Ceramic coating starts from $699, with final pricing depending on the vehicle’s size, condition and selected extras. The Car Paint Cleaning Treatment add-on costs $30.00 when the paint needs that clean without a full correction. Every car is hand-washed, so no machine brushes touch the paint.
Prime Shine Hand Car Wash is at 9/436 Wanneroo Rd, Westminster WA 6061, and bookings can be made online for a day that suits the car. Bring it when the bag check feels rough, or when polish, coating or a sale is the job. Smooth paint can wait for the next wash.
Prime Shine Hand Car Wash prepares paint with a hand wash, clay where bonded contamination remains, and machine correction when the finish needs it, then protects the result. If your bonnet still feels gritty after a wash, or you are lining the car up for polish, coating or sale, book the prep instead of guessing at home. Visit Prime Shine Hand Car Wash and choose a time that fits the job.