







You notice it in the Perth sun more often than anywhere else, a pale line on the bonnet, a scuff near the door handle, a scratch you swear wasn’t there last week. The annoying part isn’t just how it looks. It’s the question that follows, whether it’s a quick wipe, a proper car paint scratch repair, or the kind of damage that starts cutting into resale value if you leave it alone.
The right answer depends on depth, not guesswork. A scratch that stays in the clear coat can often be corrected with polishing, while anything that reaches paint, primer, or bare metal changes the job completely. In Australia, that difference matters because clear exterior damage can affect market value, and once corrosion starts, the repair gets more expensive and more involved NRMA guidance on exterior damage and value.
Why That Scratch in the Paint Matters More Than It Looks?
You spot a scratch in the car park and it looks minor enough to ignore. Then the sun hits it, the line turns obvious, and the panel starts to look tired. For Perth drivers, that matters fast, because a mark on the paint affects more than appearance, it changes how the car presents at trade-in, at lease return, and in everyday use when the finish no longer looks properly looked after.
The layer you’ve damaged decides the bill
Modern paint is built in layers. Clear coat sits on top, then base coat, then primer, then the substrate beneath. If the mark is only in the clear coat, polishing or other correction work may be enough. Once the scratch reaches colour, primer, or metal, the job shifts into refinishing territory.
That difference changes the repair path and the cost. A shallow mark can often be handled with polishing or touch-up methods, but a deeper one can open the door to moisture, UV, and dirt. Once that happens, the work often expands to sanding, paint build-up, and, if metal is exposed, rust prevention. For a closer look at how a clean surface affects later repair decisions, see this car paint cleaning treatment guide.
A quick rule helps on the driveway. If the panel still feels smooth and the damage looks like a faint line rather than a gouge, treat it as a finish problem first. If it feels sharp or catches hard, assume the repair is deeper until you prove otherwise.
Owners often leave small marks alone until they build up. That usually costs more later, because a panel that only needed light correction can end up needing repaint work once the defect spreads or oxidation starts to show. In Perth, sun and dust make that risk more common, so waiting is rarely the cheaper call.
How Can You Tell How Deep a Car Scratch Really Is?
Before you buy a compound or open a touch-up kit, test the scratch. Guessing by eye is how people either under-fix the damage or burn through clear coat that still had plenty of life left. The simplest checks are tactile and visual, and they tell you which repair path you’re really on.
Start with the fingernail and spray test
Run a clean fingernail across the mark. If your nail barely glides over it and doesn’t catch, you’re probably dealing with a clear-coat defect. If it catches lightly, the scratch may have reached the colour layer. If it catches sharply, or the line looks white, grey, or exposed, you’re likely dealing with primer or metal.
A light mist of water can help too. If the mark disappears briefly when wet, that usually points toward a superficial clear-coat issue. If it stays obvious under water, you’re looking at a deeper defect that won’t be fixed by polishing alone. Dust, sand, and harsh sun can make these lines easier to see on Australian cars, but they can also make the surface look worse than it is, so test before you act.
Match the result to the repair path
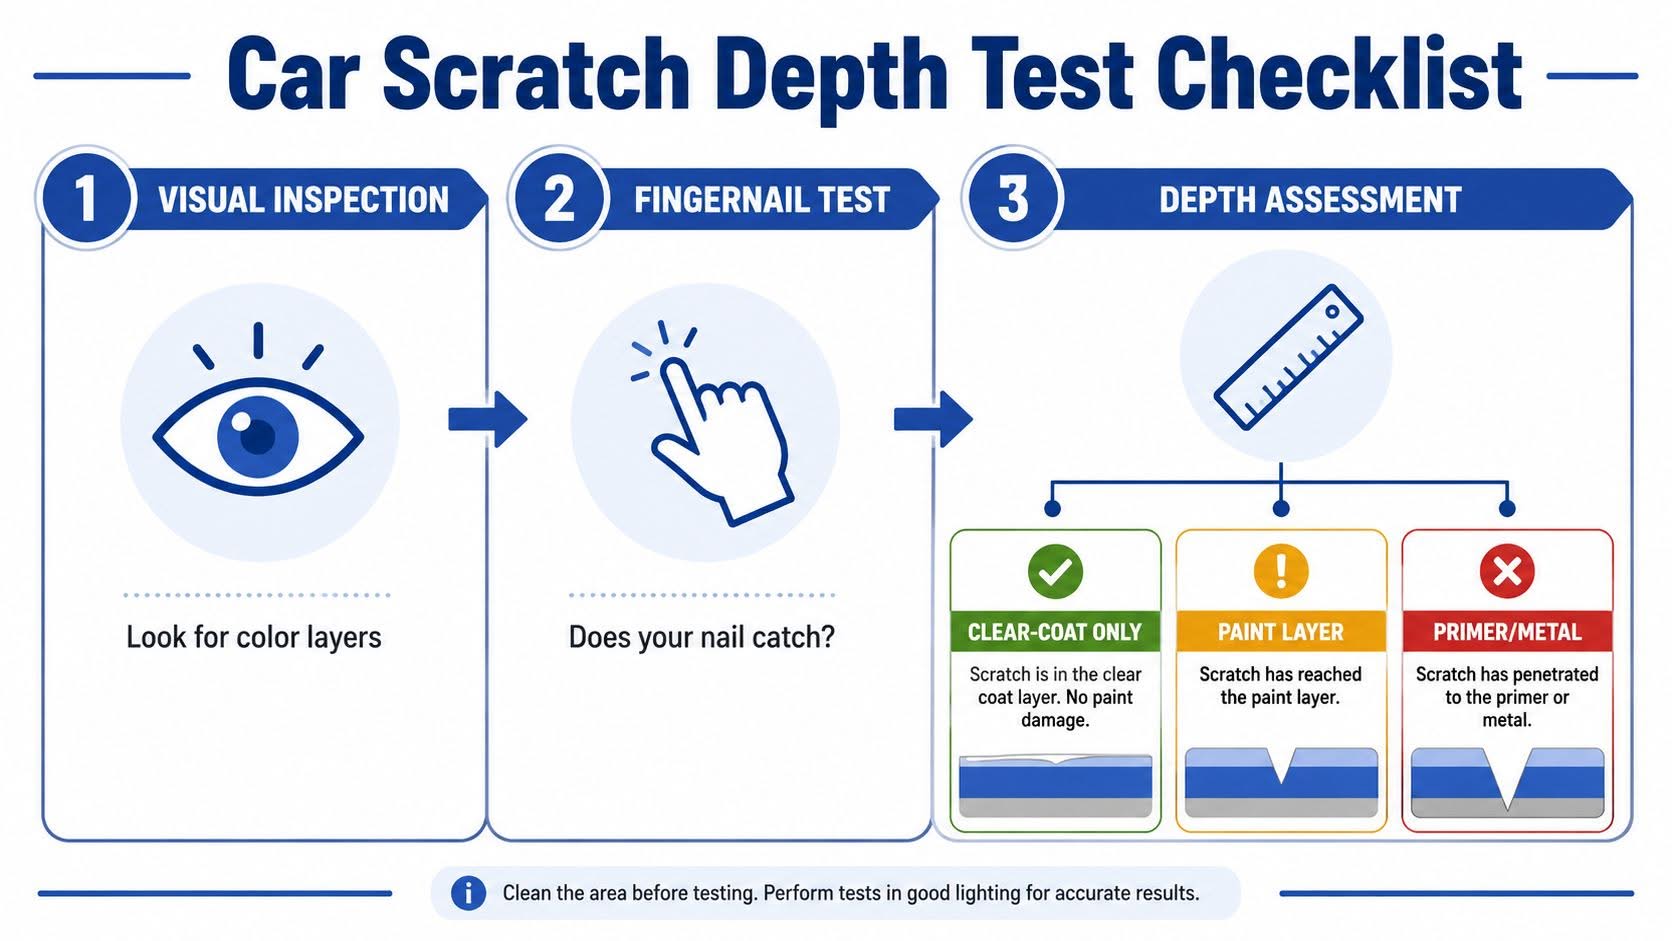
If you want to keep the diagnosis simple, think in four bands:
- Clear coat only, usually a polishing or light machine correction job.
- Paint layer, usually a touch-up and level-out job.
- Primer exposed, usually a careful repaint and seal job.
- Bare metal, usually a rust-aware repair or workshop job.
For a Perth owner, that split matters because it tells you whether the job is a weekend detail, a half-day repair, or something better handed over. If you’d rather reset the whole panel before deciding, a proper surface clean and decontamination step can help clarify what’s damage and what’s just bonded grime, which is why some owners start with a paint cleaning treatment before they commit to a repair method.
Fixing Clear-Coat Scratches With Polish and Compound
A scratch that barely catches a fingernail often sits in the clear coat, and that is the point where polish and compound can do real work. The aim is to level the surrounding finish enough to soften the mark, not to rebuild colour. Patience matters here, because forcing the correction usually leaves a bigger dull patch than the original line.
Prep the panel before you touch the machine
Wash the area first, then dry it fully. Any grit left on the panel can load the pad and turn a light correction into a wider haze. If the paint has bonded contamination, clay it before you start compounding so the pad is not fighting embedded dirt.
For a deeper clear-coat defect, a cautious wet sand can help before polishing, but the safe end of that process is 3000-grit wet sanding followed by machine polishing. For owners who want a more detailed breakdown of machine settings and pad choices, see our expert light scratch removal guide. Professional repair guides also point to 2000 to 3000 grit for final levelling, with the sanding done across the scratch rather than along it so the repair blends better. That trims the defect without cutting needlessly into the surrounding clear.
Polish lightly, then stop
Start with a cutting pad and compound, then move to polish. The job is to reduce the scratch, not to keep attacking the panel until the mark vanishes at any cost. On dark paint, that approach can thin the clear coat and make the repair easier to spot later, especially under strong sun. Metallic finishes have the same problem, because aggressive polishing can leave a patch that reflects differently from the rest of the panel.
Useful benchmark: If the scratch only fades after heavy pressure and repeated passes, the repair is already drifting beyond a simple DIY correction.
Finish the panel with a sealant or wax so the corrected area is not left exposed. Keep the panel cool, work in shade, and avoid machine polishing a hot bonnet in direct sun. If you are choosing a finish product rather than a full correction routine, a hand wax and polish can suit very light marks and help protect the result after a gentle correction. For a more controlled workshop finish, a Perth driver can also book a cut polish.
Repairing Paint Layer Scratches With Touch-Up Products
Once the fingernail catches and you can see that the colour layer is broken, polish alone won’t hide the line. Touch-up work starts here, and the quality of the finish depends more on patience than on the brand of bottle in your hand. Thin layers and proper levelling matter more than trying to fill the scratch in one go.
Build the repair slowly
Clean and degrease the panel first. Then feather the edges with 600 to 1,000 grit so the damaged edge doesn’t stand up like a ridge around the repair. That sanding step matters because touch-up paint sticks best to a clean, softened edge, not a hard chipped boundary.
Apply colour in thin coats, using a fine brush or pen matched to the paint code. Let each coat flash off before the next one goes on. Thick applications are where most failures start, because the paint skins over on top while solvent stays trapped underneath, which leaves you with sinkage or a visible mound once it cures.
Level the repair after curing
Once the colour is built, seal it with clear coat. After the clear cures, level the area with 2000 to 3000 grit and finish with polish so the new paint edge doesn’t sit proud of the surrounding panel. That final levelling is what separates an obvious blob from a repair that reads as a small blemish unless someone leans in close.
If the colour looks a little off after curing, don’t rush to sand it harder. Match issues are common on metallic and pearl finishes, and blending into the adjacent panel can be the difference between acceptable and distracting. The less you chase the colour with aggressive buffing, the better your odds of keeping the clear coat intact.
A simple touch-up kit can sit in the lower-cost range for Australian drivers, while a workshop spot blend moves much higher depending on the panel and finish. The cheap option only stays cheap if you keep the layers thin and the levelling careful.
Handling Primer and Bare-Metal Scratches Safely
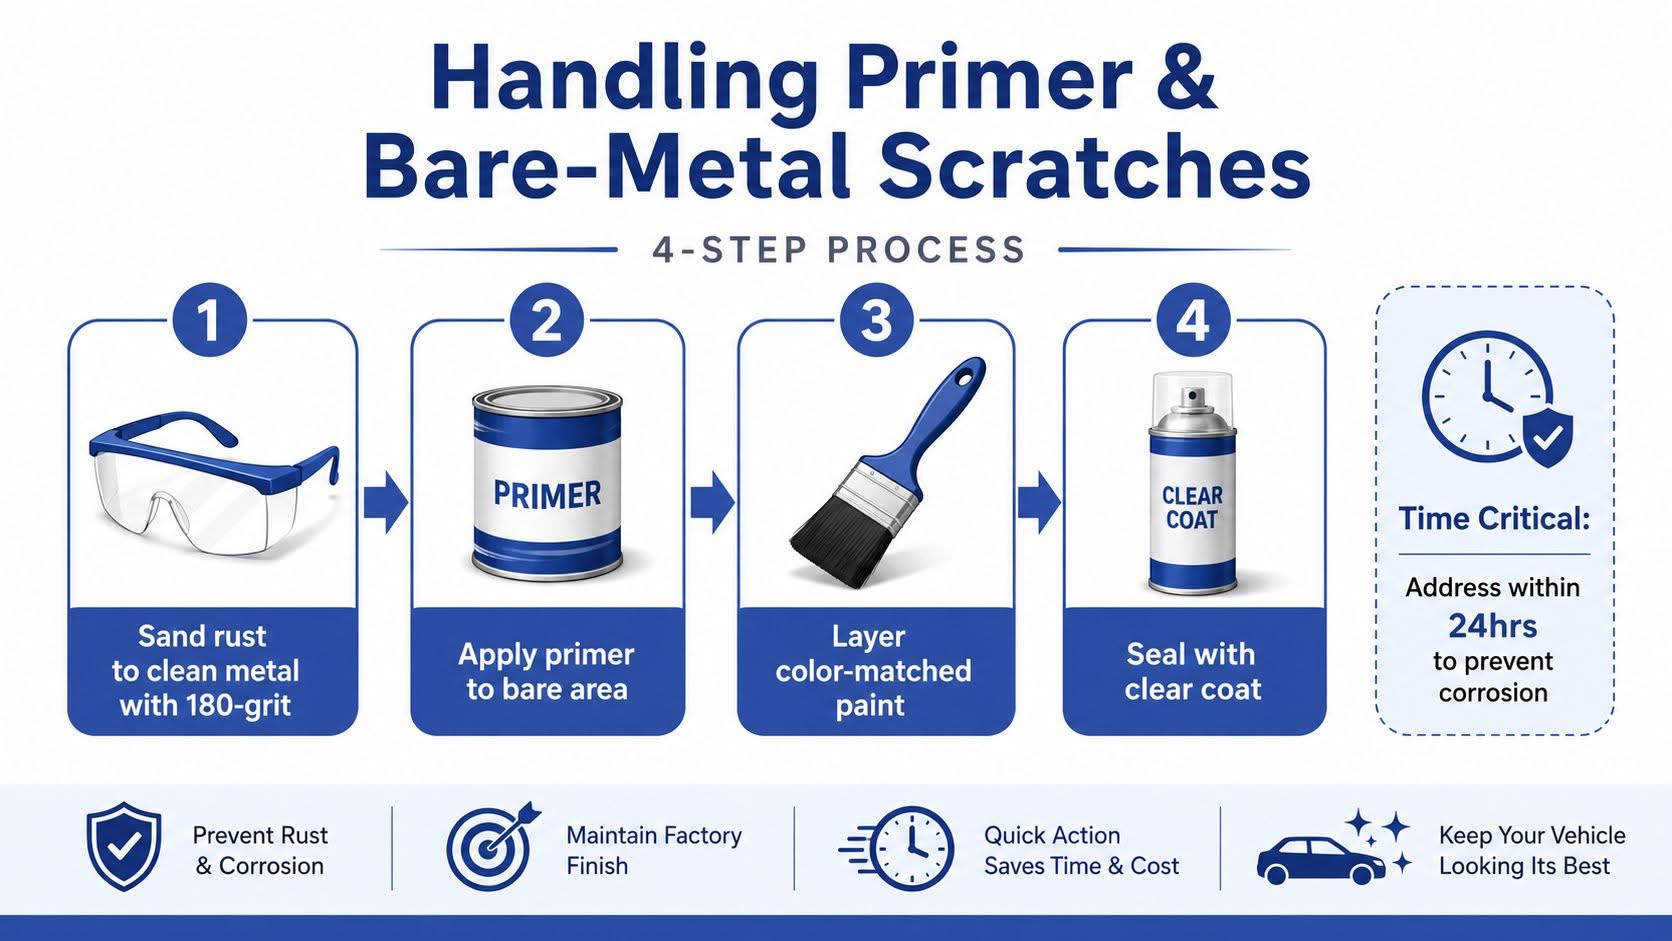
When primer or bare metal shows, the repair stops being a cosmetic patch and becomes a corrosion job as well. The clock starts the moment the substrate is exposed, because moisture and contamination can turn a small parking scrape into a rust repair that needs far more time to undo. This is the point where shortcuts get expensive.
Strip back to sound material first
Start by removing contamination and any loose material. If rust is present, sand it back to clean metal with 180 to 320 grit, then feather the surrounding paint with 400 to 600 grit. Those ranges are aggressive enough to clear corrosion, but still controlled enough to shape the repair zone without chewing half the panel.
Apply primer only where bare substrate is exposed. After that, build thin colour coats, not heavy ones, then finish with 1 to 2 wet coats of clear. Once the coating cures, denib with 2000 to 3000 grit and polish so the edge blends back into the panel instead of standing up like a ridge.
Know when the job stops being sensible
If the scratch is deep, rusty, or on a panel that’s already been repaired before, the DIY risk climbs fast. The problem isn’t just appearance. A poor seal can trap moisture under the paint system, and that’s how bubbling starts months later. Rust under fresh paint is one of the most frustrating failures to redo because the damage usually spreads beyond the original scratch.
Don’t rush the cure because the panel looks dry. Dry to the touch and fully cured are not the same thing.
For a light rust-free repair, a careful owner can still manage the process in a driveway with enough patience. Once the damage is wide, flaky, or on a panel where finish quality matters, the workshop route is usually the cleaner long-term answer.
Where DIY Repair Becomes a Risk Worth Avoiding?
The hardest part of car paint scratch repair is knowing when to stop. A lot of owners are confident on a single shallow mark, then get into trouble when the scratch runs across a curve, sits on a dark panel, or shows up on a metallic finish where blending is unforgiving. That’s when a careful repair becomes a visible one.
The stop line is usually about shape and finish, not just depth
Multiple scratches in one panel are harder to blend because each one reflects light differently. Complex body curves add the same problem, especially on bumpers and guards where the panel bends away from the eye. If the panel lives in full Perth sun for hours each day, any mismatch in gloss or texture becomes easier to spot.
Dark colours punish over-polishing. Metallic finishes punish poor colour match. Plastic bumpers punish rushed sanding and heavy clear application because the surface flexes and shows ridges faster than a flat steel panel. If the scratch is in one of those zones, a patient DIYer can still do the prep, but the last 20 percent of finish quality is where the risk lives.
Safety and finish control matter too
Compounding creates dust and residue, so goggles and a mask are sensible when you’re sanding or machine-polishing. Solvent fumes from touch-up products deserve fresh air, not a closed garage. Even the driveway matters, because a slick patch of polish residue near the front wheel can make footing sloppy while you’re leaning over a panel.
If the clear coat is already thin, aggressive correction can remove more material than the scratch itself damaged. That’s a one-way mistake on darker paint, because once the gloss is gone, you can’t polish back what you’ve removed. At that point, preserving the remaining clear coat is worth more than forcing a perfect-looking one-off result.
Get Expert Help Before You Go Too Far
Bringing It Together and Knowing When to Book a Pro
The simplest way to decide is to start with the depth test and then match the repair to what the scratch has reached. Clear coat only usually suits polish or compound work. Paint layer damage usually needs a thin touch-up, then levelling and a final polish. Primer or bare metal shifts the job into repaint territory, and that is where time, cost, and the chance of a visible edge rise fast.
If the scratch still catches a fingernail and shows a different colour underneath, stop treating it like a quick buff. That point tells you the damage has gone past surface correction, and on darker or metallic paint the margin for error gets smaller because any haze, swelling, or sanding mark stands out sooner.
| Repair Path at a Glance | Scratch Depth | Best DIY Method | Realistic Time | Typical AU Cost |
|---|---|---|---|---|
| Light correction | Clear coat only | Polish and compound | Short | A$60-A$210 |
| Touch-up repair | Paint layer | Thin touch-up, clear, level, polish | Half-day or longer | Low hundreds |
| Rust-aware repair | Primer or bare metal | Sand, prime, rebuild, cure, polish | Longer, often split over stages | A$400-A$1,500+ |
That cost pattern matches the way Australian repair work usually moves from detailing into refinishing. A small mistake on the wrong panel can be expensive to undo, especially when the clear coat is already thin or the car has a dark finish that shows every blend line. If the scratch sits beyond a confident DIY job, or you do not want to risk cutting through the clear on a darker car, a professional hand-detailing and paint-correction service is the safer call.
Prime Shine Hand Car Wash in Westminster handles hand wash, detailing, cut and polish, and paint protection from a single local site, so it suits jobs that have moved beyond a driveway fix. If you are in Perth and want the scratch assessed before it gets worse, their cut and polish service is the right place to start.
If the mark is still bothering you, do not leave it to bake in the sun and collect road dust for another week. Book an inspection or a corrective detail with Prime Shine Hand Car Wash, and get the panel back to a finish that looks cared for instead of patched.