








Washing your car every one to two weeks suits most Perth drivers, while vehicles used near the coast should generally be washed weekly. Restoring gloss, however, takes more than washing more often. It requires careful preparation, paint correction where needed, and protection that can withstand Perth’s sun, salt, dust and seasonal rain.
You’ve probably seen the problem already. The car looks clean after a wash, but the paint still appears flat in direct sunlight. Fine swirls show around the door handles, the bonnet feels rough, and the finish loses its reflection soon after you leave the driveway. That usually isn’t a frequency problem alone. Washing removes loose dirt, while gloss restoration deals with bonded contamination, surface defects and weakened protection.
Perth rewards a structured maintenance routine. The right schedule reduces the amount of abrasive grime sitting on the paint, but the right process determines whether the finish stays smooth and reflective.
Want a cleaner starting point? Inspect the paint in direct sunlight before your next wash, and note whether the surface feels rough, looks hazy or shows circular marks.
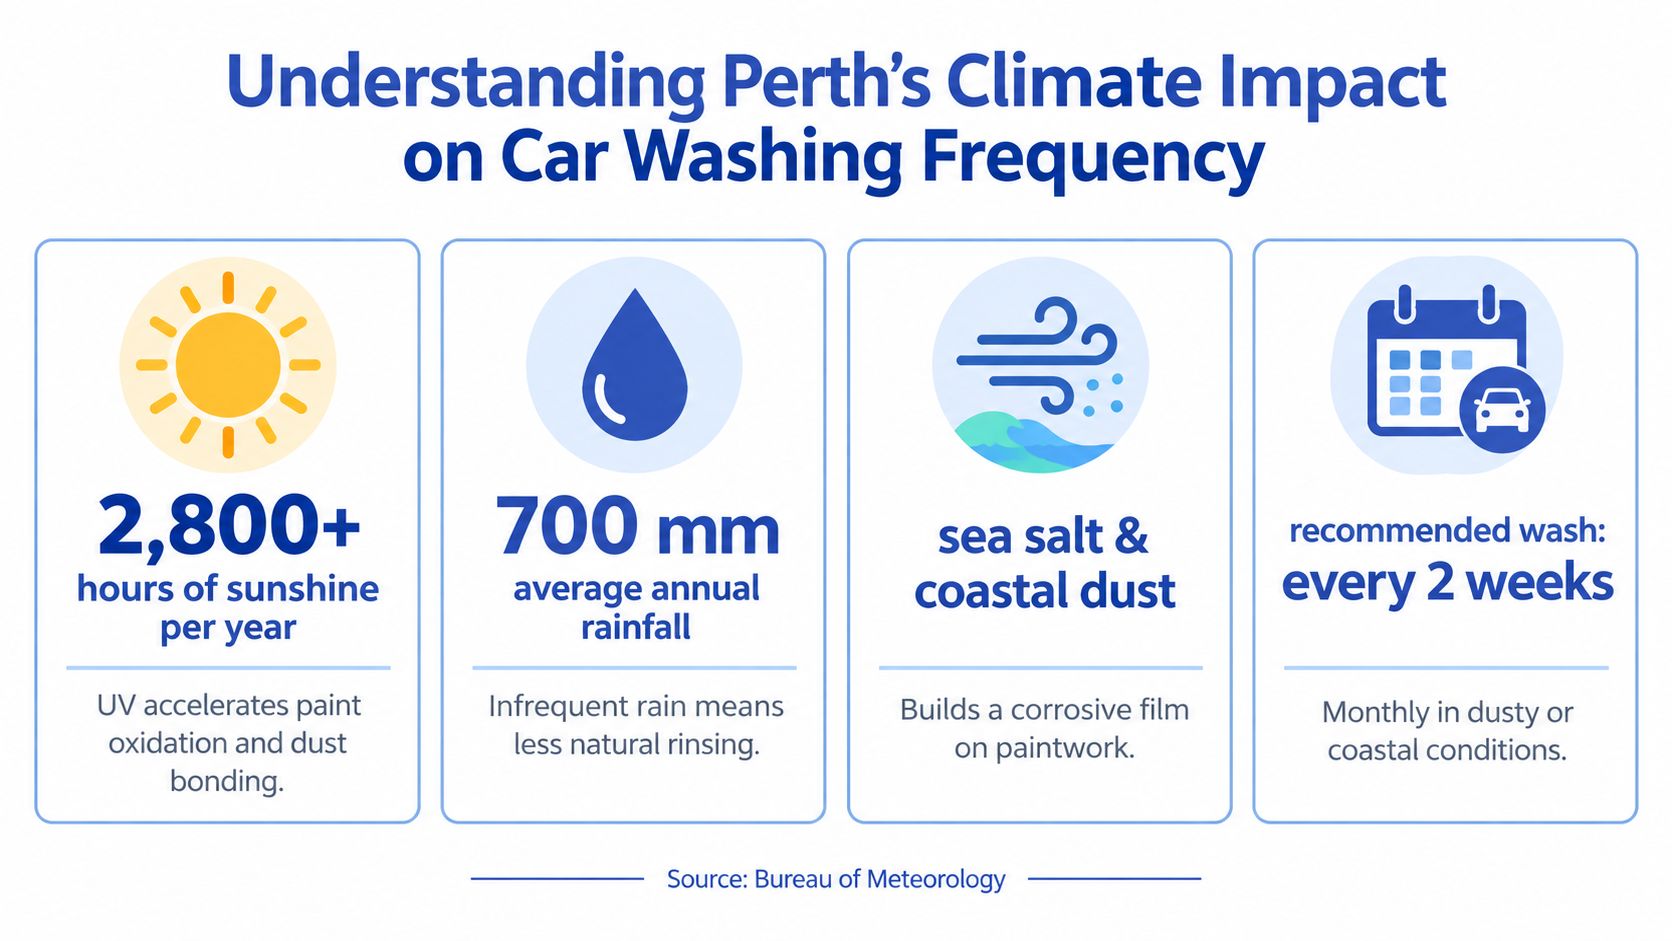
Understanding Perth’s Climate Impact on Car Washing Frequency
Perth’s climate changes the washing routine that works best. Around 80% of the region’s rainfall falls between May and October, while November to April is typically dry, and some months may pass without rain. The Bureau of Meteorology also records a long-term mean of 80.1 days with at least 1 mm of rain each year, so an outdoor vehicle still faces moisture, road residue, mud and water spotting across the calendar year. These figures come from the Bureau of Meteorology’s Perth climate guide.
That pattern changes how often a car should be washed. During the wetter months, rain and road spray push grit into wheel arches, panel gaps and lower doors. During the dry months, dust and coastal particles stay on the paint until a proper wash removes them. Heat makes matters worse by drying residue onto the surface, where it can bond instead of rinsing away cleanly.
Which Perth conditions change the schedule?
Parking and driving habits matter as much as the forecast.
- Coastal exposure: Salt-laden air leaves a fine film on paint, glass, wheels and trim. If you regularly drive or park near the coast, weekly washing is the safer baseline.
- Outdoor parking: A car left outside picks up dust, bird residue, pollen and airborne contamination even when it is not being driven.
- Construction and unsealed roads: Fine dust becomes abrasive when it is rubbed across the clear coat. A rinse or wash after dusty use is better than leaving that material to sit.
- Daily commuting: More kilometres usually mean more road film, brake dust and dirty spray from other vehicles.
- Sheltered, light use: A garaged vehicle used occasionally can usually go longer between washes, provided contamination is not allowed to build up.
A Perth-oriented wash benchmark puts standard vehicles on a one-to-two-week cycle, with coastal, dusty and outdoor-use vehicles tending toward the shorter end of that range. Suburban cars with light use may sometimes stretch to two or three weeks, while monthly washing is still a common habit for Australian drivers, though that cadence is often too slow for a car exposed to salt, dust and strong heat.
Practical rule: If the paint feels gritty, the wheels are heavily coated or rain has left a dirty film, wash the vehicle based on its condition rather than the date of the last wash.
Water rules also matter. Perth drivers can still wash a car with a hose under the current local rules, but restrictions differ between jurisdictions. Check the current Perth water-restriction information before changing your routine, especially if you are washing a fleet, a work vehicle or several cars. If you need clearer guidance on timing a wash around heat, dust and seasonal conditions, use this Perth car-washing timing guide as a practical reference.
Perth’s climate also affects gloss. Repeated dust, salt film and sun exposure do more than make paint dirty, they dull reflections and leave the finish looking flat even after a basic wash. That is why wash frequency is only the first decision. Restoring and protecting gloss takes more than removing loose grime.
Before washing, touch the paint with clean fingertips after a rinse. If it still feels like fine sandpaper, regular shampoo alone will not restore the surface.
The Complete Paint Gloss Restoration Process from Start to Finish
Gloss restoration starts before the polishing machine or bottle of protection comes out. If grit remains on the paint, every later step can spread that contamination across the surface and create more marks. A disciplined preparation stage is what separates a genuine correction process from a quick cosmetic wipe-over.
How should the surface be prepared?
Begin in shade, with cool panels. Perth’s warmth can dry shampoo and cleaning chemicals quickly, leaving mineral marks or residue before you’ve finished the section.
- Rinse thoroughly first. Use water to loosen dust, sand and loose road film. Don’t touch a dry, dusty panel with a cloth.
- Use a pH-neutral shampoo. A gentle shampoo removes surface grime without needlessly interfering with existing protection.
- Apply the two-bucket method. Keep wash solution in one bucket and rinse the mitt in the other. A clean mitt and frequent rinsing reduce the chance of dragging grit across the clear coat.
- Work from the top down. Roof, glass, bonnet and upper panels generally carry less heavy contamination than sills, bumpers and wheels.
- Clean wheels separately. Brake dust and road residue from wheels shouldn’t be transferred to painted panels. Use separate tools for wheels, arches and bodywork.
- Dry completely. A clean drying towel or controlled air helps prevent water spots in mirrors, badges, panel gaps and trim.
The surface should now be clean, but it may not be decontaminated. Run a clean hand over the dry paint inside a thin plastic bag. A rough or uneven feel indicates bonded material that shampoo hasn’t removed.
What does decontamination add?
A clay bar or synthetic clay treatment lifts deposits that sit tightly on the surface. Use plenty of lubrication, light pressure and small areas. If the clay catches, stop and add lubrication rather than pressing harder. The aim is to remove contamination, not grind it into the clear coat.
Chemical decontamination can also help with deposits that respond better to a dedicated treatment than to mechanical clay. Follow the product instructions and rinse thoroughly. Test an inconspicuous area first, particularly on older paint, repainted panels or sensitive trim.
Only after washing and decontamination should you inspect defects properly. Strong, diffuse lighting reveals swirls, oxidation and dull patches more reliably than a quick look in a shaded driveway. Mask or protect rubber, textured plastic and unpainted trim before polishing.
Skipping preparation creates several predictable problems:
- Polish becomes contaminated: Abrasive particles can reduce clarity instead of improving it.
- Defects remain hidden: Bonded residue can make paint appear dull even after a correction pass.
- Protection bonds poorly: Wax, sealant or coating applied over residue won’t have a properly prepared surface.
- Drying marks increase: Warm panels and leftover minerals can create spotting that becomes another correction task.
The full workflow is wash, decontaminate, inspect, correct, refine and protect. A detailed explanation of correction stages is available in this paint-correction process guide.
If the paint still feels rough after washing, stop chasing gloss with more shampoo. Decontamination is the next sensible step.
Machine Polishing Versus Hand Polishing for Paint Correction
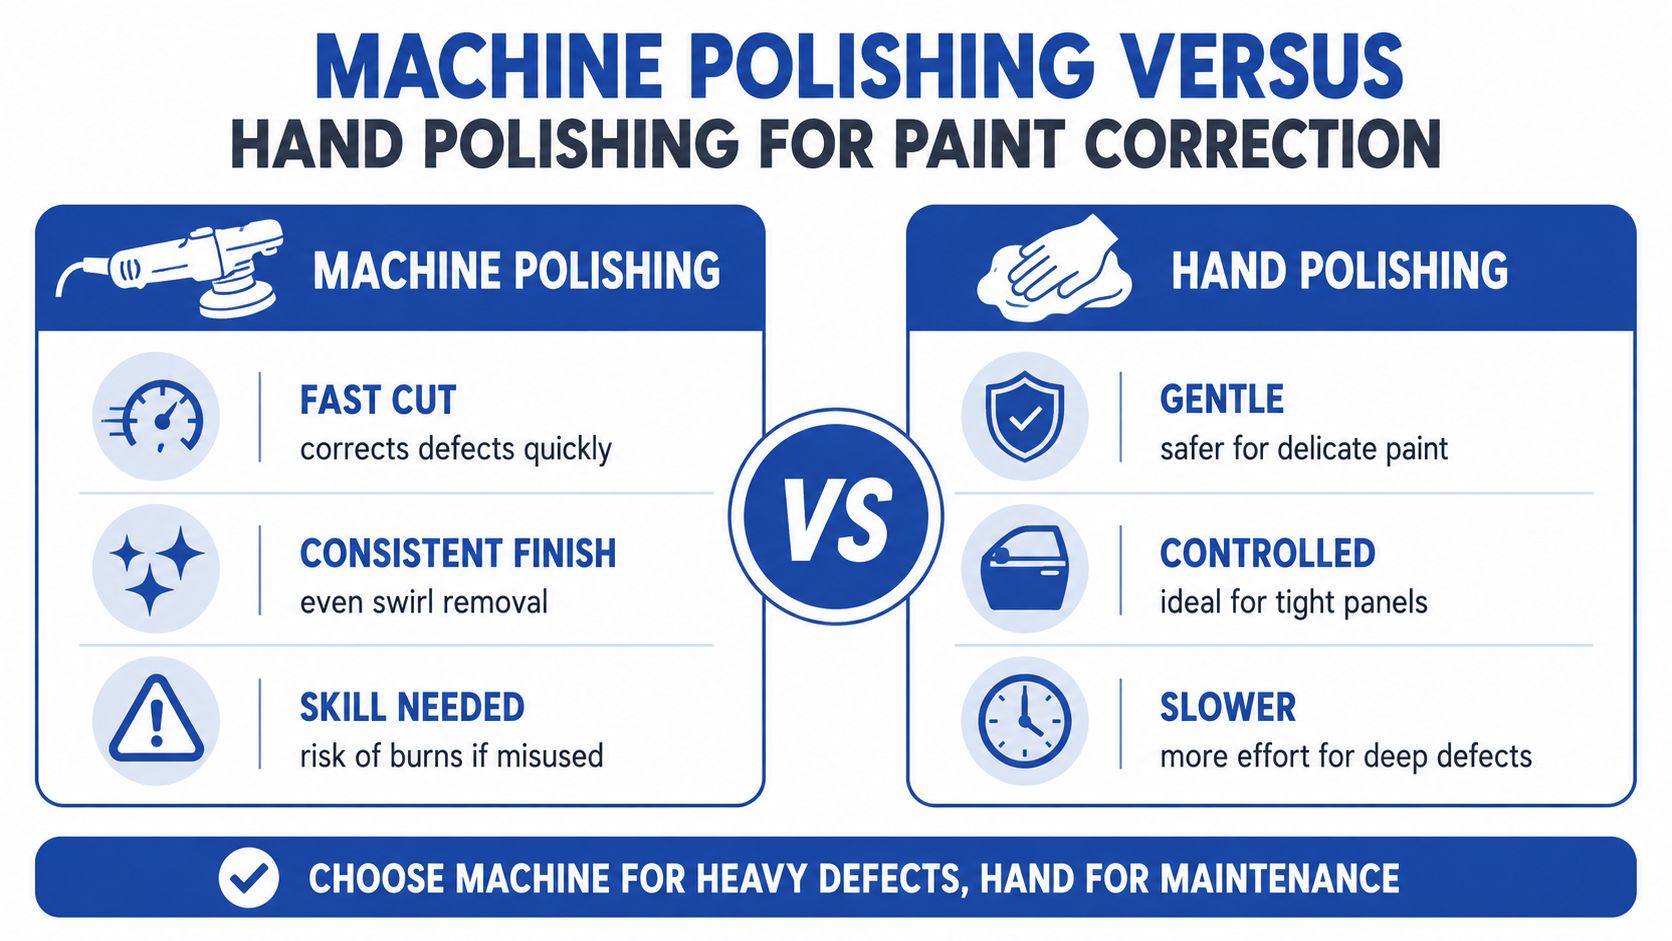
Hand polishing and machine polishing can both improve a finish, but they’re not interchangeable. The sensible choice depends on the severity of the defects, the size of the vehicle, the condition of the paint and your ability to control pressure, movement and product residue.
When is hand polishing enough?
Hand polishing suits localised correction and gentle refinement. It can improve light haze, mild wash marks and small areas around door handles or narrow pillars. It also gives you immediate feedback through your fingertips, which is useful on delicate trim or panels where a larger pad would be awkward.
The limitation is consistency. Human pressure changes from one pass to the next, and a large bonnet or roof can require significant effort before the finish looks uniform. Deep scratches and widespread oxidation generally need more controlled and consistent mechanical action than hand application can provide.
Hand polishing makes sense when:
- The defect is isolated: Work on a small area rather than correcting the entire vehicle.
- The paint is delicate: Use conservative products and test first.
- You’re maintaining a corrected finish: Minor haze can be refined without aggressive cutting.
- You lack machine experience: A slower process is preferable to uncontrolled paint removal.
When does machine polishing make sense?
A dual-action machine polisher can maintain more consistent movement and pressure across broad panels. With the correct pad and compound, it can reduce swirls, oxidation and light scratches more efficiently than hand work. A rotary machine can deliver stronger correction, but it demands greater control and a careful approach around edges, body lines and repainted areas.
Machine polishing isn’t automatically safer or better. Incorrect pad selection, excessive pressure, prolonged work in one spot or polishing a contaminated panel can leave haze, sharp-edged defects or heat-related damage. Beginners should start with a mild combination on a test area and inspect the result before increasing the cut.
A useful comparison looks like this:
| Approach | Best suited to | Main advantage | Main limitation |
|---|---|---|---|
| Hand polishing | Small defects and light refinement | Direct control and a gentle approach | Slow on broad or heavily marked panels |
| Dual-action polishing | General correction and gloss improvement | Consistent movement with manageable control | Requires technique, suitable pads and inspection |
| Rotary polishing | Serious correction by experienced users | Strong cutting ability | Greater risk if used carelessly |
The two approaches can work together. A machine can correct the broad panels, while hand polishing can refine tight sections that a pad can’t reach safely. Either way, measure success by improved clarity and reduced visible defects, not by trying to remove every mark. Some scratches extend too far for safe correction and are better left than chased aggressively.
Use this Perth cut-and-polish guide for a closer look at the process and its limitations.
A correction pass should improve reflection without sacrificing sound paint. If you can’t judge the depth of a scratch, choose preservation over aggression.
Finishing Polish and Protection Options for Long-Term Gloss
Correction creates clarity, but the finishing stage determines how that clarity looks and how easily you can maintain it. A cutting compound may reduce defects while leaving a slight haze or microscopic residue. A finishing polish uses a finer approach to refine the surface and improve the crispness of reflections.
Work on a clean, prepared panel and remove residue carefully between sections. Don’t apply protection over polishing oils, dust or leftover compound. The surface should look even under direct inspection, with no obvious smearing or patchiness.
Which protection suits your vehicle?
The main options are wax, sealant and ceramic coating. None removes the need for washing, and none makes paint immune to scratches or contamination. Their differences are practical.
Wax offers a traditional warm appearance and straightforward application. It suits owners who enjoy regular maintenance and don’t mind refreshing the layer as part of their routine. Wax can make washing feel easier, but it’s less suitable for someone seeking a long interval between protection treatments.
Sealant generally provides a more uniform, durable barrier than a traditional wax. It can suit daily drivers that need easier maintenance without the preparation and curing considerations of a coating. Application still depends on a clean, residue-free surface, and neglected contamination can compromise the result.
Ceramic coating creates a durable protective layer that can improve water behaviour and make routine cleaning easier. It’s attractive for Perth vehicles exposed to strong sunlight, dust and coastal air, but it requires more careful preparation and application. A coating won’t hide poor paint correction, and it won’t prevent damage from careless washing, bird residue or abrasive wiping.
How should protection be maintained?
Use a gentle wash method, separate bodywork tools from wheel tools and dry the vehicle without dragging contamination across the surface. Avoid waiting until the paint looks dull before checking the protection. Reduced water behaviour, increased surface roughness and stubborn road film indicate that the maintenance process needs attention.
The best choice is the one you’ll maintain consistently:
- Choose wax if you prefer a simple, hands-on refresh.
- Choose sealant if you want a practical protective layer with manageable upkeep.
- Choose ceramic coating if you’re prepared to invest in thorough preparation and careful maintenance.
Protection preserves a corrected finish. It doesn’t replace correction, and adding more product over a poorly prepared surface won’t restore lost gloss.
After correction, prioritise clean preparation over a thicker layer of product. A thin, evenly applied protective layer on a clean surface is more useful than excess product over contamination.
Knowing When Professional Detailing Saves Time and Money
DIY maintenance is effective when the task matches your equipment and experience. A careful wash, decontamination and light hand polish can make a meaningful difference on a reasonably maintained vehicle. Problems start when an owner keeps escalating the process without knowing how much paint remains or which defect they’re trying to correct.
Professional help becomes sensible when the finish has widespread oxidation, extensive swirling, deep scratches, staining, overspray or uneven previous repairs. It’s also worthwhile when the vehicle is large, heavily used or needed for sale and the owner can’t spend the required time inspecting every panel. A professional process can identify which defects are safely correctable and which should remain.
What should you ask before booking?
Ask for a clear description of the proposed process rather than accepting a vague promise of a shiny finish. A reputable operator should be able to explain whether the service includes washing, decontamination, paint inspection, correction, finishing and protection.
Check these points:
- Preparation: Does the service include a thorough wash and decontamination?
- Correction level: Is the work intended to refine light marks or address heavier defects?
- Paint inspection: Will the operator inspect panels under suitable lighting?
- Protection: What product will be applied, and what maintenance does it require?
- Vehicle condition: Can the price change if heavy contamination or previous damage is found?
- Handover advice: Will you receive practical washing guidance after the service?
Professional equipment can save time, but equipment alone doesn’t create a safe result. Technique, lighting and product selection matter just as much. Repeated DIY attempts can also become expensive when an aggressive compound, unsuitable pad or dry-wiping habit adds fresh marring.
A realistic service should improve the finish without promising that every scratch will disappear. Review examples of comparable vehicles, ask how the operator handles repainted panels and confirm exactly what’s included. This Perth car-detailing cost guide can help you understand why condition, vehicle size and selected services affect the scope of work.
If the car looks dull immediately after washing, diagnose the paint before buying stronger products. The correct service may be decontamination, polishing or protection, not another routine wash.
Creating Your Perth-Specific Car Care Maintenance Schedule
A useful schedule starts with exposure, not habit. A garaged vehicle used lightly can follow a different routine from a coastal commuter, site ute, family vehicle parked outdoors or fleet car working through dusty areas.
For vehicles exposed to coastal air, dust or outdoor parking, a one-to-two-week exterior wash cycle is a practical starting point. Weekly washing suits heavier exposure, while a lightly used and sheltered vehicle may manage a longer interval if the paint remains clean and smooth. The Perth vehicle-maintenance guidance supports more frequent exterior cleaning for dust-heavy, construction, beach and fleet conditions.
What should the routine include?
- After exposure: Rinse and dry salt, dust, or heavy road film before it bonds.
- Every one to two weeks: Complete a pH-neutral two-bucket wash, wheel clean, and careful dry.
- Every two to four weeks: Vacuum the cabin and clean high-touch interior areas for regularly used vehicles.
- Every three to six months: Inspect the finish, refresh protection, and schedule deeper decontamination or detailing where needed.
- When gloss fades: Assess for bonded contamination, oxidation, and swirls rather than just increasing wash frequency.
Perth’s wet season usually calls for closer attention because rain and road grime arrive together. The drier period still demands care because dust, salt and baked-on residue can remain on the paint for longer. Adjust the routine after beach trips, dusty work, construction driving or extended outdoor parking.
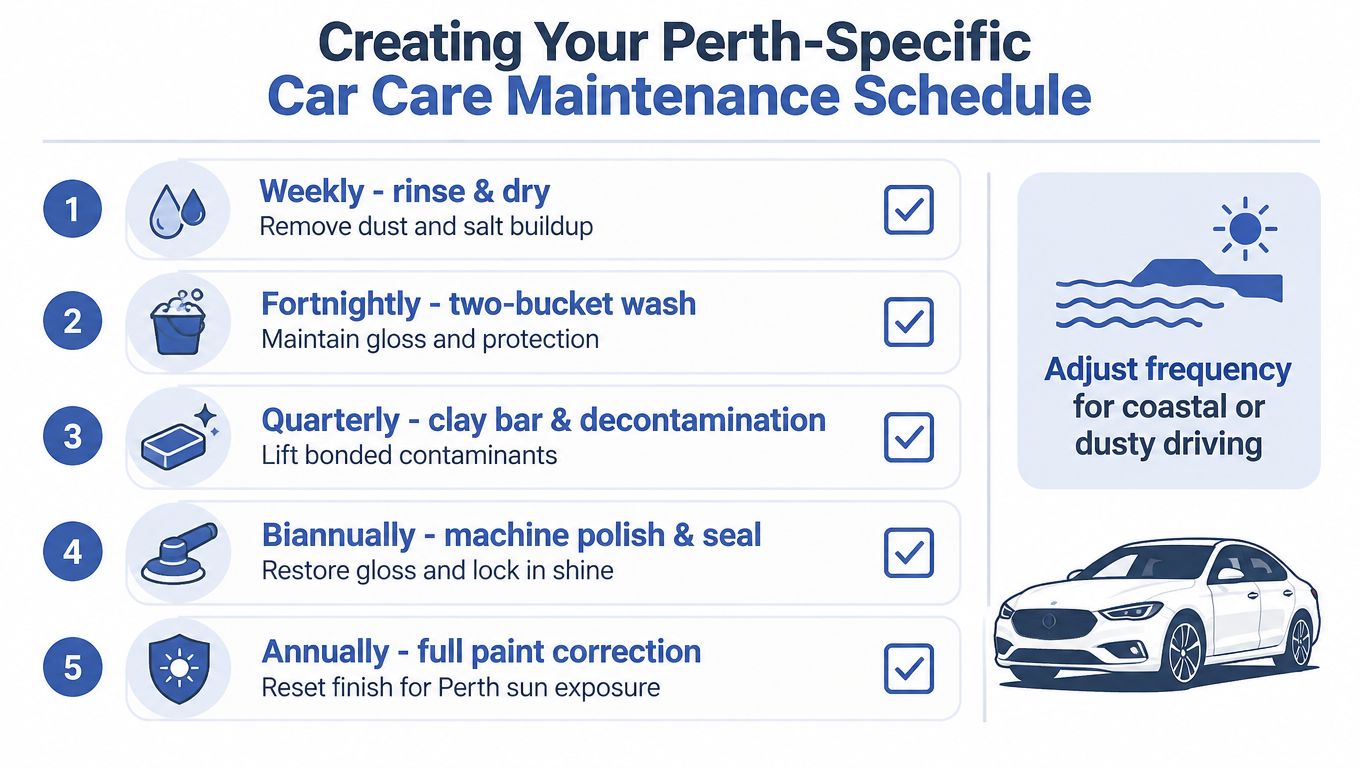
Think of gloss as an ongoing condition rather than a one-off result. Washing removes current contamination, correction restores clarity, and protection makes future maintenance more manageable.
Set your next wash date now, then book paint correction or protection if washing no longer brings back the reflection you want.
Prime Shine Hand Car Wash offers hand washing, interior and exterior detailing, cut and polish, and ceramic coating at its Westminster site, giving Perth drivers options for routine cleaning or deeper gloss restoration. Visit Prime Shine Hand Car Wash to review the services and book a maintenance or paint-care appointment.