







The advice to buy a strong compound and keep polishing until every scratch disappears is a poor starting point. A cut and polish kit removes paint material, so a shinier finish today can come at the expense of protection you’ll want later under Perth sun.
For a daily driver exposed to dust, red dirt and road film, the sensible target is a cleaner, clearer finish with as much original clear coat preserved as possible. Choose the process around the paint’s condition, not around how aggressive the kit claims to be.
Before buying a kit, wash the car and identify which marks actually need correction.
What Is Inside a Cut and Polish Kit?
A cut and polish kit is a set of abrasive liquids, pads and tools that levels the clear coat in stages, from cutting to fine finishing. Think of sanding timber with coarse paper followed by fine paper. The cutting compound does the heavier levelling; the finishing polish refines the surface afterwards.
A useful kit supports the entire process, not just the shiny part. Preparation equipment comes first because polishing over contamination can introduce more marks. Australian research identifies mixtures of road dust, tyre-derived particles and brake residue in traffic-related contamination, supporting the need for careful washing and decontamination before correction.
Check the preparation products before comparing cutting compounds.
Core components of a cut and polish kit
| Component | What it does | Choice to make | Common mistake |
|---|---|---|---|
| Clay bar or clay mitt | Lifts bonded contamination after washing | Use plenty of lubricant and suitable chemical preparation for tar | Polishing over grit left on the paint |
| Cutting compound | Levels heavier swirls and light scratches | Use only where defects need it | Cutting every car by default |
| Cutting pad | Carries compound on wool or aggressive foam | Foam for most users; wool for experienced operators | Running wool at high speed on thin paint |
| Finishing polish | Removes cutting haze and refines gloss | Follow a cutting stage with refinement | Leaving haze behind |
| Finishing pad | Carries finishing polish on soft foam or suitable microfibre | Keep separate from cutting pads | Mixing pads between stages |
| Dual-action polisher | Uses oscillating movement for controlled polishing | Preferred beginner option | Using a rotary without training |
| Masking tape and trim cover | Protects plastics, rubber and vulnerable edges | Apply before machine work | Leaving black trim exposed |
| Microfibre towels | Wipe residue between stages | Turn to a fresh side regularly | Reusing a dirty towel |
| Inspection light | Reveals swirls and haze | A bright LED torch is useful | Inspecting only in soft shade |
| Paint thickness gauge | Assesses coating thickness before correction | Particularly useful on repainted panels | Assuming appearance proves sufficient clear coat remains |
Which tools deserve priority?
A dual-action polisher is the more forgiving beginner choice because its movement makes heat easier to manage than a rotary. It isn’t burn-proof. A rotary needs training, especially around edges and curved panels.
Treat a conventional paint gauge as a warning tool, not permission to cut harder. Most ordinary gauges indicate the combined coating thickness rather than isolating the clear coat. Budget hand-applied kits are more suitable for light haze or small-area improvement than substantial whole-car correction.
Choose a kit you can control, rather than the most aggressive kit you can afford.
Before purchase, check for:
- Preparation supplies: Wash products, lubricant and appropriate decontamination tools.
- Separate stages: Clearly identified cutting and finishing products with dedicated pads.
- Inspection equipment: Clean towels, masking tape and strong lighting.
- Clear directions: Compatible machine, pad and product instructions.
Explore paint-correction stages
What Does Cutting and Polishing Remove, and How Much Is Too Much?
Swirls can often be reduced, but every abrasive pass spends a little of the clear coat that protects the colour underneath. In Perth, that trade-off matters: sun exposure, red dirt and road film keep working on the remaining coating after the car leaves the garage.
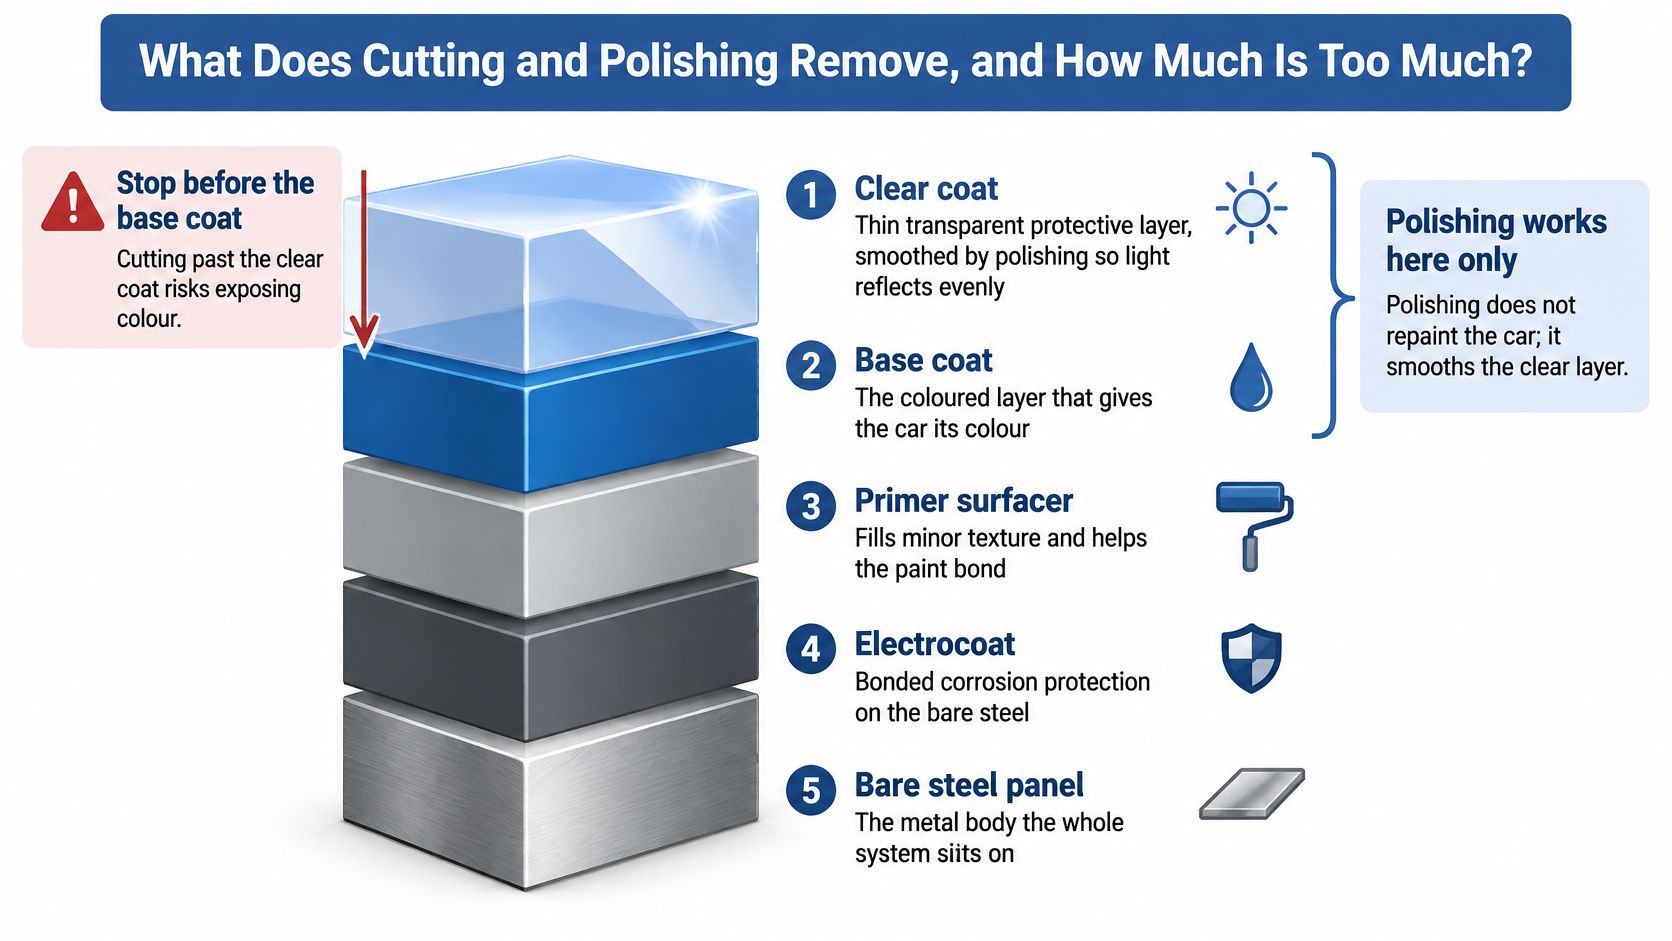
On a clear-coated car, colour sits beneath a transparent protective layer. Polishing smooths the surface so light reflects more evenly. It can make shallow defects less visible, but it does not repaint the vehicle or replace lost coating.
The paint-thickness assessment important before correction explains that a typical complete paint system is approximately 100–125 micrometres, with clear coat commonly around 40–50 micrometres. The clear coat provides the surface finish and UV protection. Aggressive compounds can remove several micrometres, so a thickness reading should inform the decision before correction. A standard gauge generally measures the combined coating, not clear coat alone.
Treat remaining clear coat as protection with a limited service life, not material to spend on every mark.
Which defects can improve?
Swirls are shallow marks that show clearly in direct light. Some light scratches also sit within the clear coat and may respond to controlled correction. Decide based on the likely depth, paint condition and amount of coating available. Removing a swirl today has little value if the work leaves the panel with too little protection for years of Perth sun.
A scratch that catches a fingernail calls for caution. That test cannot measure its exact depth, but it suggests the mark may be more than routine surface marring. If damage reaches the colour coat or primer, polishing cannot safely remove it.
Key concept: Cutting levels the clear coat. It doesn’t restore paint that has been scratched through.
Dullness needs diagnosis too. Surface oxidation may improve with polishing, while peeling, cracking or failed clear coat needs a different repair. Further cutting will not stabilise failing paint.
Can a DIY kit make paint worse?
Yes. Too much pressure, heat, an unsuitable pad or repeated aggressive passes can leave haze, deeper marks or localised coating failure. A kit is better suited to shallow defects on sound paint, with controlled work and regular inspection.
RAC WA’s sale-preparation guidance advises against removing too much clear coat. It recommends washing and drying first, applying compound section by section, polishing lightly with a soft, dry cloth, and avoiding strong or direct sunlight.
If you can’t establish whether a panel is safe to correct, arrange an assessment before using compound.
The guidance also suggests cut and polish at least every six months. Treat that as a maintenance suggestion, not a reason to machine-cut on a fixed schedule. Reassess the actual defects and paint condition before using an abrasive. On a sun-exposed bonnet or roof, preserving clear coat may matter more than removing a faint mark.
Where should you stop?
- Inspect between passes: Wipe away residue and check the result before repeating.
- Respect vulnerable areas: Mask edges and badges, and avoid concentrating correction on raised body lines.
- Control conditions: Keep the panel cool and work clear of dust and grit.
- Accept a remaining mark: If a suitable gentle approach does not improve it, stop rather than automatically increasing the cut.
A faint scratch left in sound paint can be a better result than flawless-looking paint with too little protection remaining.
Read the clear-coat safety guide
Which Kit Suits Your Car’s Paint Condition?
Start with the least aggressive combination capable of improving the defect. Move towards heavier correction only after a test shows that the gentler option is inadequate and the paint condition supports further work.
Don’t buy a heavy-cut kit just because the car looks dull. Contamination, finishing haze and damaged coating can look similar from a distance, yet require different decisions. Record what you see on each panel before choosing products.
Match the kit to the paint you have, not the finish shown on its packaging.
Kit approach by paint condition
| Paint condition | Typical signs | Suggested kit approach | Pad and compound |
|---|---|---|---|
| Well kept, light wash marks | Fine haze in direct sun, few swirls | Finishing polish only | Foam finishing pad, no cutting compound |
| Daily driver with light swirls | Swirls visible in sun, paint still glossy | One-step polish | Medium foam polishing pad with finishing polish |
| Faded or oxidised paint | Chalky or dull finish, heavier swirls | Cut, then finish, provided the coating is sound | Medium foam cutting pad; wool only for experienced operators, then finishing pad |
| Red dirt and sun-exposed panels | Dullness or etched-looking haze on bonnet and roof | Decontaminate, test, then consider cutting and finishing | Foam cutting pad if justified, then finishing pad |
| Dark or black paint | Swirls conspicuous under inspection lighting | Finer system with careful inspection | Finishing pads with conservative abrasive choice |
| Repainted or thin paint | Possible colour mismatch or uneven gloss | Measure first; consider a professional | None until assessed; gentle finishing only if appropriate |
| Deep scratches catching a fingernail | A nail catches across the mark | Not a routine polishing job; get an assessment | None until assessed |
How should Perth conditions change the choice?
Red dirt on the surface doesn’t establish that the underlying paint needs cutting. Remove it first, then inspect. Likewise, a sun-exposed roof shouldn’t receive the same aggressive combination as a better-preserved door just for consistency.
Dark paint often needs better refinement, not more cut. Strong lighting helps distinguish remaining defects from marks introduced during polishing. A finer finishing combination may produce a more convincing result than another round of compound.
Write down each panel’s condition and proposed treatment before placing an order.
A colour mismatch can suggest previous work, but appearance alone doesn’t prove a repaint or establish thickness. Sellers, lease-return owners and classic-car owners should resolve that uncertainty before correction. The distinction between enhancement and heavier work is explained in this guide to paint-correction stages and realistic results.
Your condition record can stay simple:
- Observed finish: Glossy with swirls, dull, rough or visibly damaged.
- Proposed approach: Preparation only, finishing polish or assessed correction.
- Uncertainty: Previous repairs, unknown polishing history or suspect edges.
Compare paint-correction stages
Should You Use a Kit or Book a Professional?
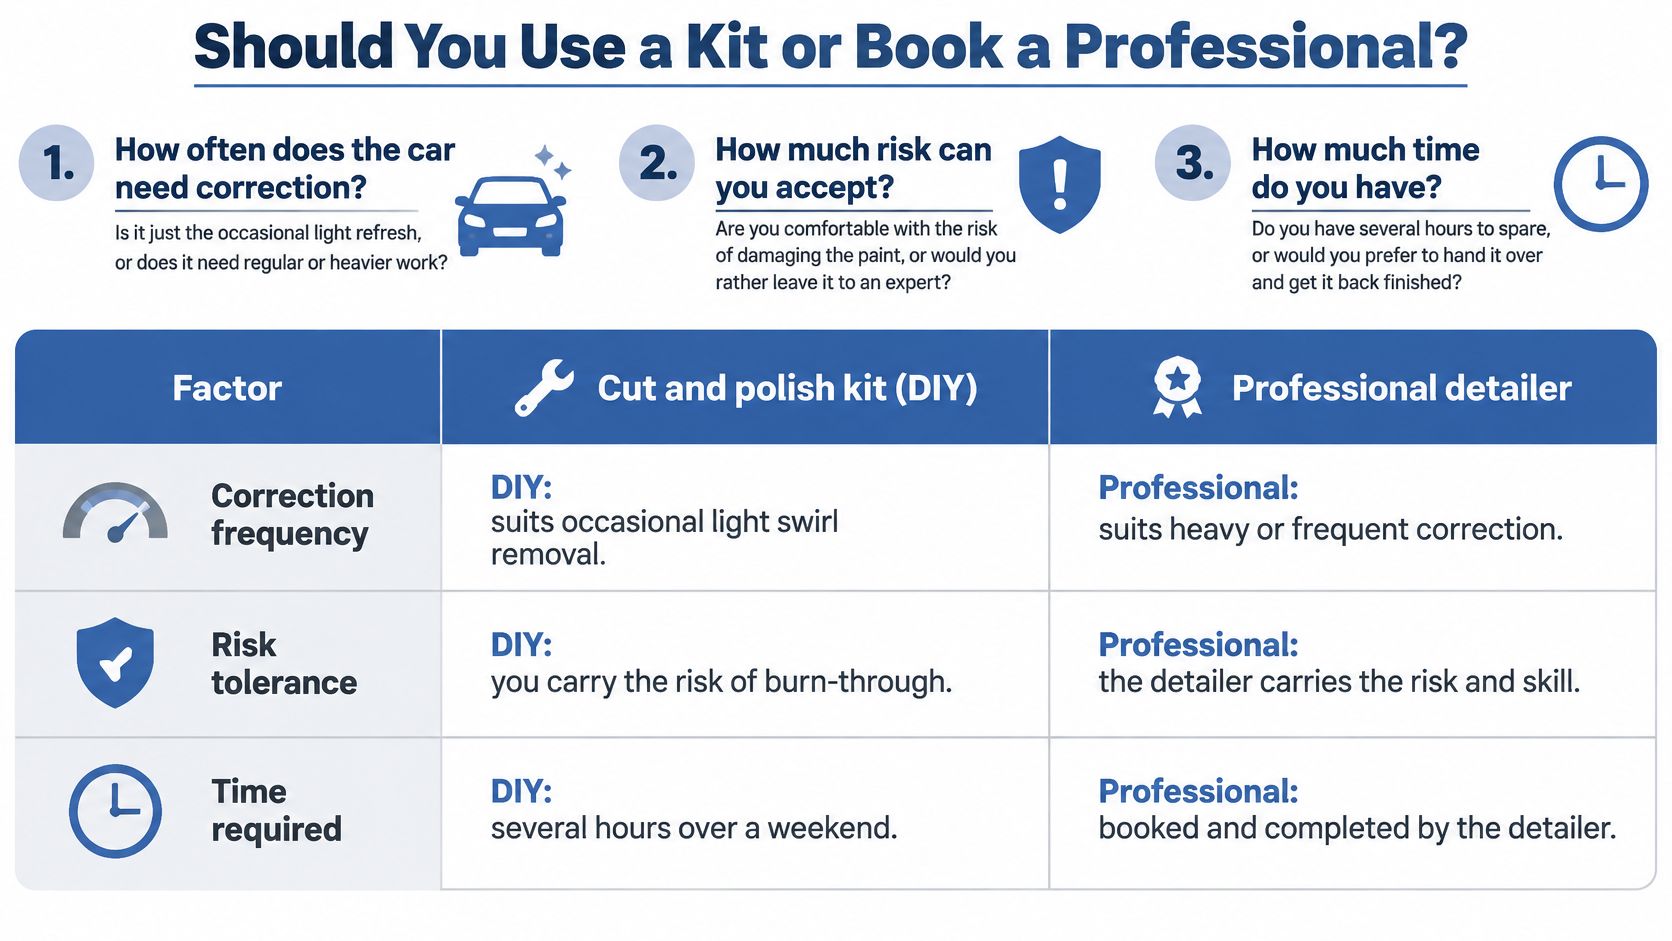
A kit can remove visible swirls, but every cutting pass uses some of the clear coat’s remaining life. That trade-off matters on Perth cars: sun exposure can leave panels unevenly aged, while red dirt and road film need proper cleaning before you decide whether the paint needs correction. Ask how often the car needs correction, how much risk you’ll accept, and whether you have time to prepare and inspect it carefully.
Owning a polisher can suit an interested owner maintaining light defects. It makes less sense if you’ll use it once on unfamiliar, heavily marked paint. Include the full setup in your cost comparison: a compound alone won’t cover pads, lighting, preparation products or suitable washing arrangements.
Compare the complete job, including preparation and clear-coat risk, rather than the compound’s purchase price.
DIY kit versus professional cut and polish
| Factor | DIY kit | Professional service |
|---|---|---|
| Upfront cost | Kit and machine purchase, reusable across vehicles | Per-job fee based on condition |
| Skill needed | Practice and controlled technique | Trained technician operates the machine |
| Equipment on hand | Supply your own polisher, pads, lighting and clay | Specialist equipment available on site |
| Risk to clear coat | Greater uncertainty for beginners and heavy cutting | Lower when the operator measures and tests appropriately |
| Consistency across panels | Can become uneven as the operator tires | More uniform with a systematic process |
| Best fit | Light maintenance on a daily driver | More involved defects, sale preparation, fleets and high-value cars |
What are the practical compromises?
- DIY advantages: You control the timing, and reusable equipment may reduce long-term spending if you maintain more than one vehicle.
- DIY drawbacks: Technique takes practice. Fatigue and aggressive cutting increase the chance of removing too much clear coat.
- Professional advantages: A detailer can assess paint thickness, test a small area and set a consistent approach across panels.
- Professional drawbacks: You pay for each job, and the result depends on the provider’s standards.
Ask a detailer what they’ll inspect, what they’ll leave alone and how they’ll decide when to stop.
For a professional option, Prime Shine’s cut and polish service includes an exterior wash, clay bar or paint preparation, and machine cutting and polishing. Pricing varies with vehicle condition.
Water use and runoff also affect where you do the job. In WA, check current local requirements before washing a vehicle at home, and consider whether the wash water could carry dirt and residue into a stormwater drain. A commercial setup may have its own wastewater controls, so ask how wash water is collected and disposed of. Don’t assume every operator handles it the same way.
How Do You Run a Safe Cut and Polish Step by Step?
The cleanest-looking result isn’t always the safest one. Every cut removes some clear coat, and Perth sun, red dirt and road film make preserving the paint’s remaining life a practical priority. Work in shade with cool panels and enough light to inspect the finish.
Wash from the roof down, using separate clean water to rinse the mitt. Keep wheel brushes and other wheel-cleaning tools away from painted panels. Grit carried onto the bodywork can create fresh marks before correction even begins.
Prepare clean pads, towels and inspection lighting before starting the machine.
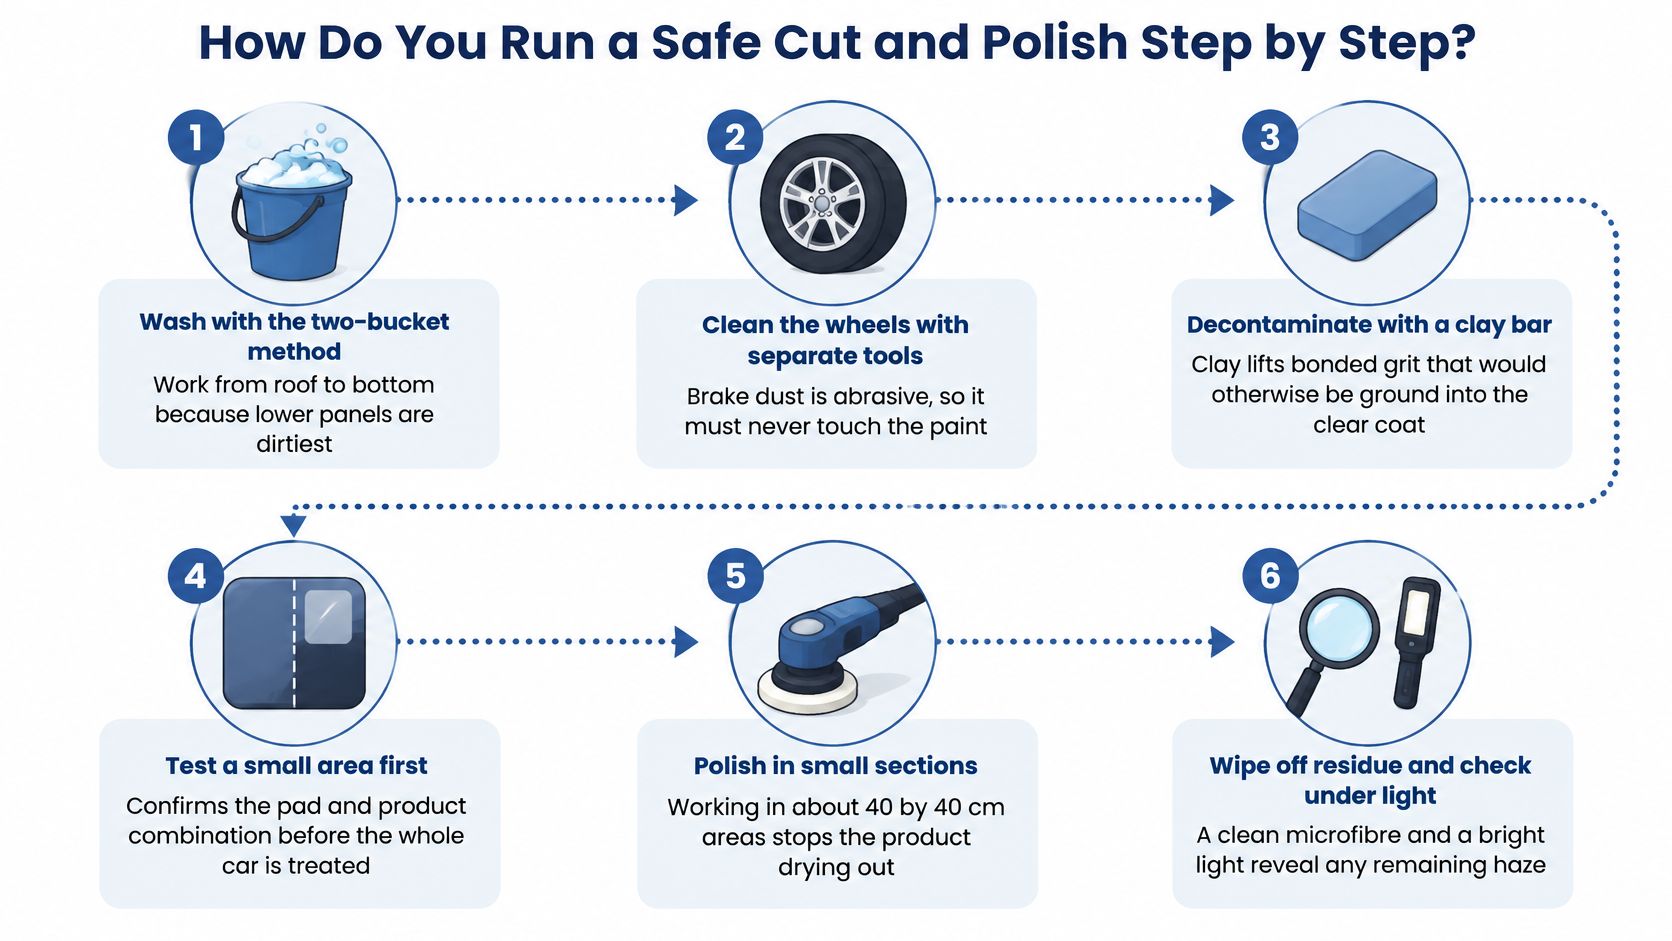
A controlled working sequence
-
Wash with separate wash and rinse buckets. Work from the roof down and refresh dirty rinse water so loosened grit does not return to the paint.
-
Clean wheels separately. Use dedicated tools. Brake residue and road grime can scratch bodywork if transferred on a brush or mitt.
-
Remove bonded contamination. Use suitable chemical preparation, then a lubricated clay bar or mitt if contamination remains.
-
Inspect under strong light. Identify the defects and mark areas that need attention. Swirls across one panel do not mean the whole car needs cutting.
-
Measure where appropriate. A suitable paint-thickness gauge can help assess panels, especially when the paint history is uncertain. Treat the reading as a guide, not permission to keep cutting.
-
Mask vulnerable areas. Protect plastic, rubber, badges and sharp edges before machine work.
-
Use the process established by your test spot. If you have not confirmed a suitable combination, pause and follow the test guidance in the next section.
-
Work small, overlapping sections. Keep the machine moving at a controlled speed and follow the equipment and product directions. More pressure or extra passes remove more paint, not just more swirls.
-
Wipe and inspect. Remove residue with a clean microfibre towel. Make another pass only if the remaining defect justifies further clear-coat removal.
-
Refine and protect. Use finishing polish with a dedicated pad, then apply a suitable wax or sealant. Learn when liquid car wax is useful.
What should you do when the finish looks wrong?
Haze after cutting usually calls for refinement, not another round of heavy compound. Pigtails or heat marks mean stop and check for contamination, a dirty or worn pad, excessive pressure or poor speed control. A defect that shows in sunlight may be incomplete finishing rather than an original mark.
Use abrasive grades for their intended purpose. Fine abrasives suit correction and finishing, while coarse materials are made for tasks such as stripping or shaping filler. Sandpaper is a poor shortcut when compound fails to deliver the expected result.
If new marks appear during polishing, stop and diagnose the cause before continuing.
Review the paint-correction guide
Should You Test a Spot or Book a Pro First?
A test panel can look clear indoors and still show haze in Perth sun. View it from several angles, preferably in changing daylight, and check again after the panel is cool. Sun exposure, red dirt and road film all affect how paint presents, so a result under one light source is not enough to judge the whole car.
The decision is a trade-off: removing visible swirls means taking away some clear coat, which then has less remaining protection against the elements. If the paint is thin, its history is unknown, or defects remain after a cautious test, stop and get a condition assessment rather than repeating the cut. This guide to paint correction without damaging clear coat explains why preserving coating matters.
For sale preparation or a lease return, ask what the paint condition supports before authorising cosmetic correction. A depth check can inform that choice, but cannot guarantee a higher sale price or prevent return charges.
A professional assessment is useful when the finish varies across panels, the paint has had previous repairs, or you cannot tell whether marks are in the clear coat. It can help set a realistic improvement target without removing coating unnecessarily.
- If the finish holds up in changing light: Use the same conservative process only on comparable paint.
- If the result is unclear or worsens: Leave further cutting to a professional.
Prime Shine Hand Car Wash offers exterior washing, paint preparation and machine cutting and polishing for swirls and light scratches. Visit Prime Shine Hand Car Wash to book a condition check and discuss whether your paint needs a light enhancement, more involved correction or careful maintenance.