








Wash and decontaminate first, inspect defects under magnification, tape off trim, cut in 2 x 2 foot sections with 50% overlap at 3,800 OPM, then polish at the lower speed of 2,400 OPM. That sequence gives you the cleanest path to a proper cut and polish without chasing problems that were never on the surface to begin with.
You can spend a Saturday making a car look worse before it looks better. The bonnet still shows spiderweb swirls in the Perth sun, the black trim looks dusty no matter how much you wiped it, and the finish feels harder to read than it should after a careful wash. That’s usually where people guess, grab a stronger product, and make the paint harder to correct.
The smarter move is to read the paint before any machine touches it. A loupe, good lighting, and a realistic sense of where your panel edges and body lines are vulnerable will tell you far more than a shelf full of compounds ever will. If you want a cleaner result with less risk, start with the condition of the paint, not with the product in your hand.
Why Your Paint Looks dull After the Wrong Wash?
You finish washing the car, step back, and the bonnet looks worse than before. The swirl marks are still there, the gloss is flat, and in harsh daylight the paint seems to carry a cloudy veil that the wash didn’t remove at all. That’s the point where blame falls on the wash, even though the wash often just revealed what was already living in the clear coat.
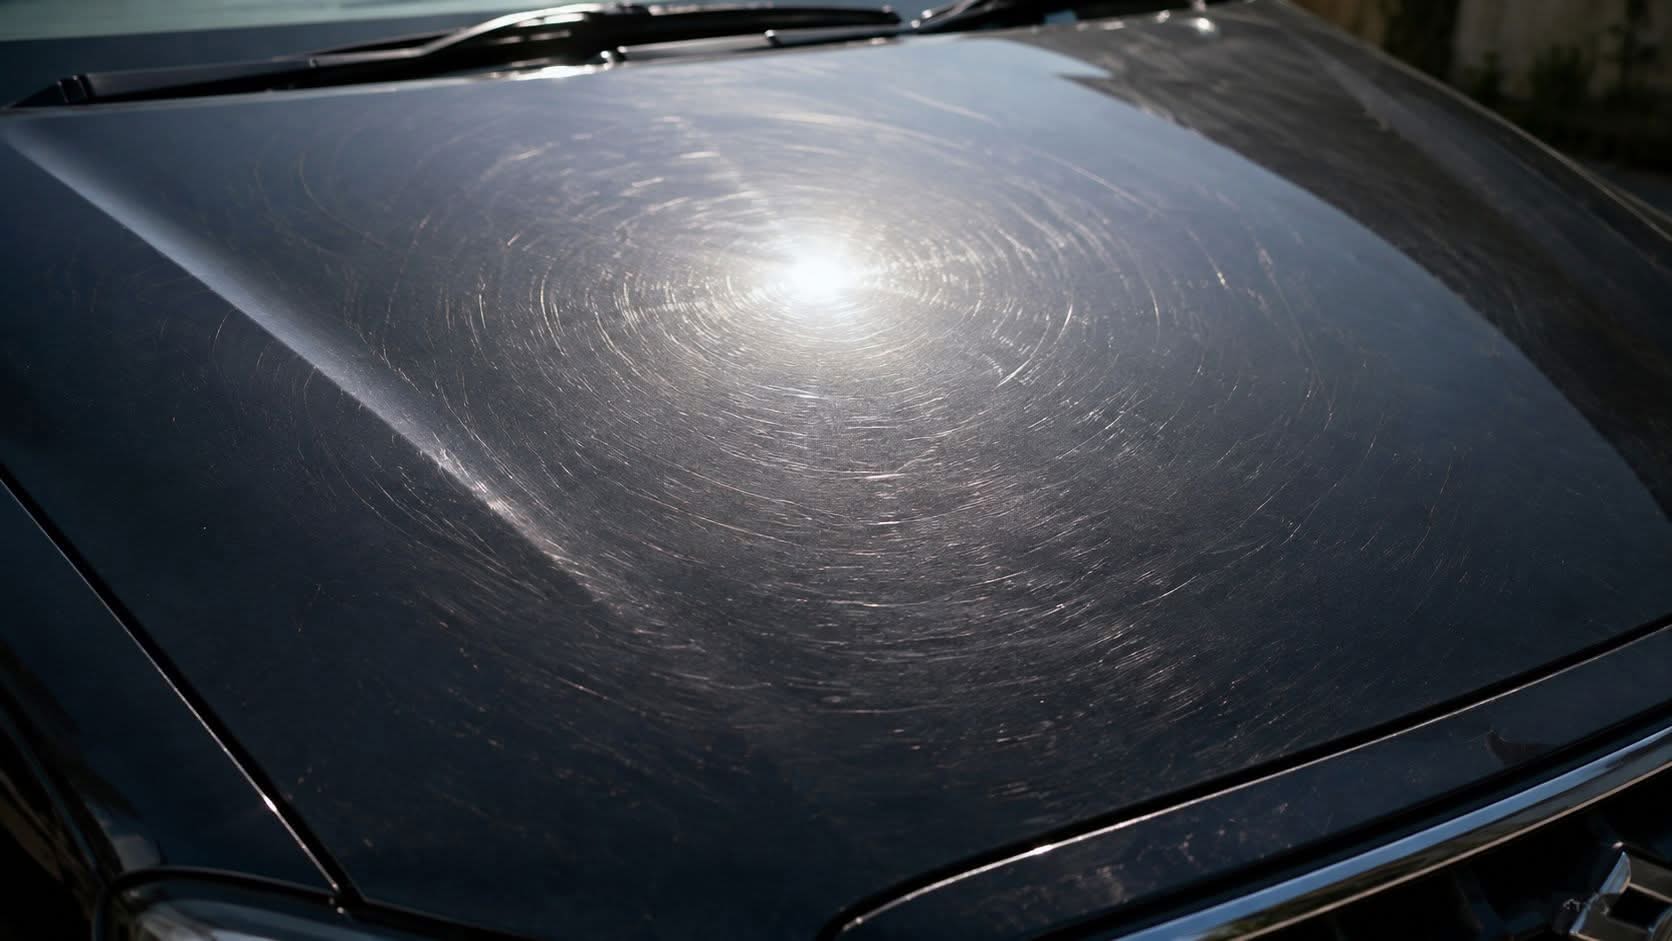
Swirls are symptoms, not always wash damage
Swirl marks can come from washing, but they can also come from old compounding, environmental fallout, or years of light abrasion. A greasy-looking finish often means the surface has been masked by residue rather than corrected, so the paint reads as dull even after a good clean. A car that has lived outside under strong sun can also show defects more clearly because the light catches every tiny disturbance in the clear coat.
That’s why a fresh wash doesn’t always produce a fresh look. If the defects are sitting in the paint, a gentle wash won’t remove them, and a wax layer may only deepen the shine around the scratches rather than eliminate them. The result is a finish that looks temporarily better in shade, then falls apart again the moment the sun hits it.
A better read starts with honest inspection. If the paint only looks bad under direct sun, the issue may be surface marring. If it looks hazy under even soft light, you’re probably dealing with contamination, failed product build-up, or a correction history that needs more than a quick gloss enhancer.
Practical rule: if the car still looks dull after a careful wash and dry, assume you’re looking at paint condition, not just wash technique.
For drivers comparing what a careful exterior wash changes, this hand-wash guide gives useful context on why a proper hand wash matters before any correction.
Preparing Your Car Before any Machine Touches the Paint
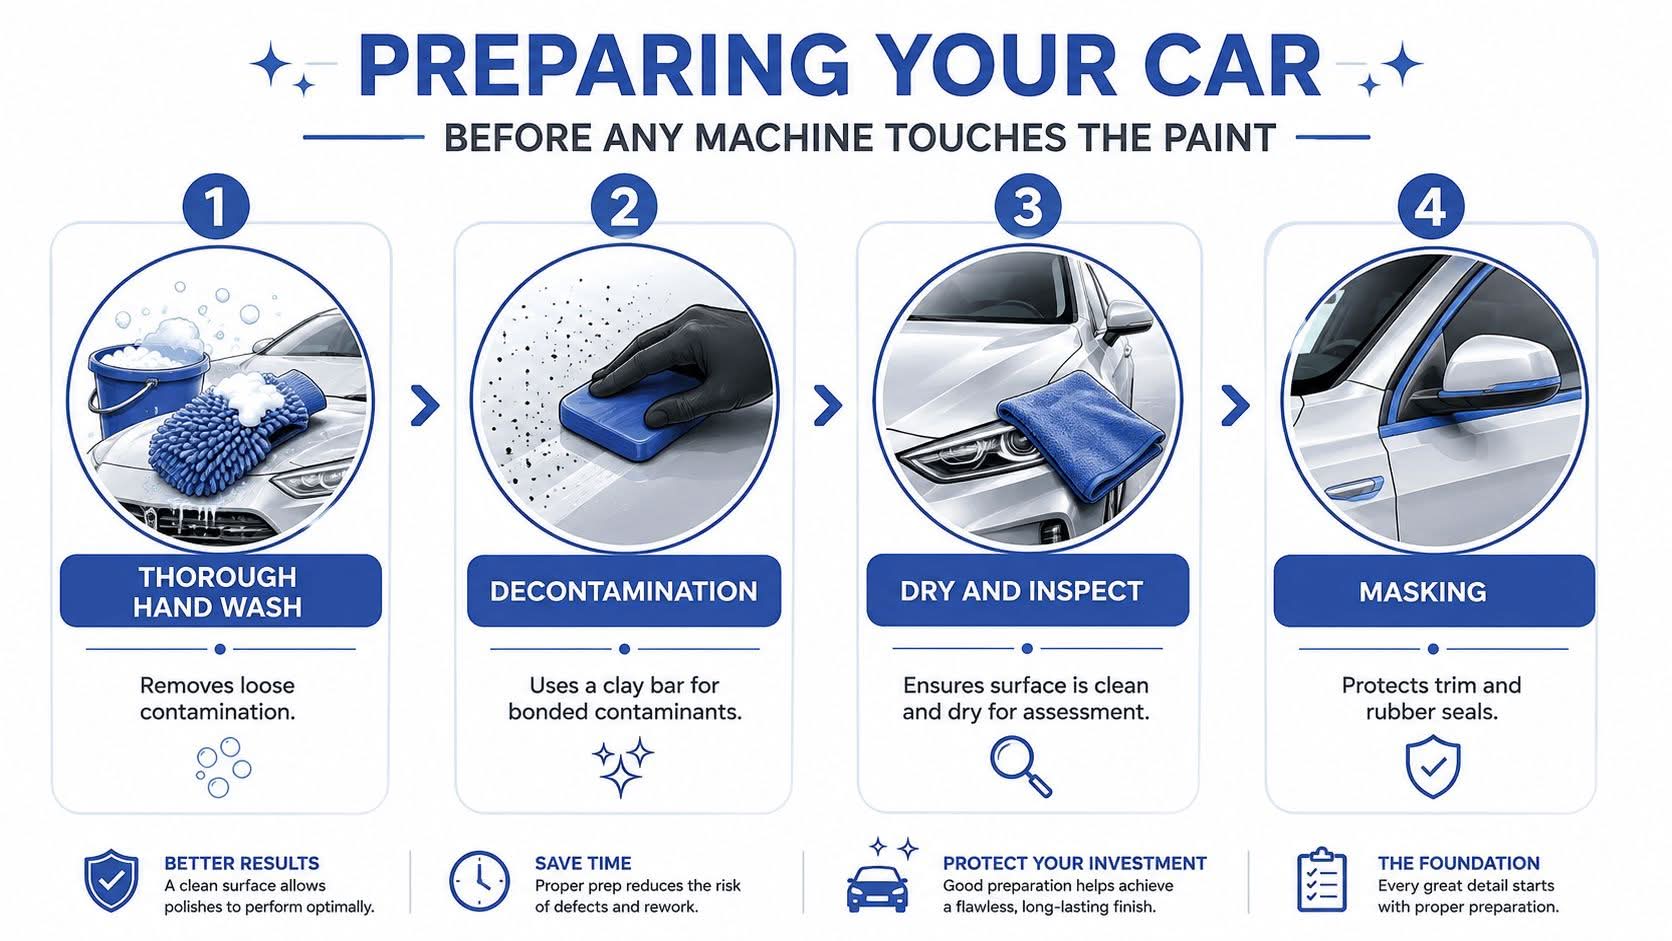
A good correction job starts long before the polisher spins. The surface has to be clean enough that you’re not grinding loose grit back into the clear coat, and it has to be dry enough that you can see what needs attention. If the car is still carrying bonded contamination, the machine just drags that junk across the panel and makes the problem worse.
Wash, decontaminate, then inspect
Start with a thorough hand wash, then use a clay bar or a synthetic decontamination method to pull bonded particles from the surface. That matters because washing removes loose dirt, but not everything that’s embedded in the clear coat. After that, inspect the paint in real light, not in the soft glow of a garage bulb that hides the defects you’re trying to fix.
A simple driveway test works well. Move the car so the panel catches angled daylight, then look for swirls, water spots, and rough-looking patches from several positions. If the surface still feels gritty or shows shadowy trails after drying, it’s not ready for machine correction yet.
Protect the parts you don’t want to touch
Mask trim, badges, sharp body lines, rubber seals, and tight recesses before you start. Modern vehicles use more black plastics, sensors, and creased styling than older cars, so one sloppy pass can leave white residue in places that are awkward to clean and easy to damage. Narrow tape helps around curves because it follows the panel line more cleanly than broad, stiff tape.
Keep tape close to the edges you want to protect, but don’t let it interfere with your working zone. If you can’t see the boundary clearly, you’ll overwork the panel out of caution and that’s where uneven results start.
If you’d rather have the preparation and correction handled by a professional team, this hand car wash and detailing page is the natural place to start.
The same prep logic applies no matter how strong your polish is. Cleanliness isn’t a cosmetic extra, it’s what keeps contamination from becoming fresh defects while the machine is moving across the paint.
Machine Settings and Technique That Work
A panel can look safe from a distance and still be risky under the pad. The machine gives you control, but only if you keep the work disciplined. Cut and polish sessions are won with small zones, steady pressure, and even overlap, not by trying to clear a full bonnet in one eager pass. On complex panels, slower and more deliberate movement usually gives the cleaner result.
Work in small zones and let the pad do the work
Use 2 x 2 foot sections, keep about 50% overlap on your passes, and hold roughly 3-5 lb of downward pressure during cutting. That combination keeps the abrasive contact even instead of patchy, which is what leaves tiger-stripe marks and uneven clarity. A measured section is easier to inspect, easier to wipe clean, and easier to correct again if the first attempt is not enough.
Speed matters too. One detailed process recommends running at 3,800 OPM for cutting, then dropping to 2,400 OPM for polishing. The higher speed is for defect removal, while the lower speed is for refining the finish and removing the haze that cutting can leave behind.
Read curves and edges differently
Convex curves can pull the pad off the surface if you lean too hard or move too quickly. Concave recesses hold extra product, so the pad can load up and start smearing instead of cutting cleanly. Body lines and sharp creases need extra caution because paint there is effectively working thinner, and that is where burn-through risk climbs fast.
Do not chase every visible defect the same way. A flat bonnet, a sculpted bumper, and a tight crease need different hand pressure and different expectations.
A 30x LED loupe is worth using before you even start. Swirls visible at 30x usually point to a medium-cut stage, while etch marks that show at 50x often need wet-sanding rather than compound. That gives you a practical decision point before you put a machine on the panel, which helps prevent overworking defects that the machine will not remove cleanly.
On Perth vehicles with sharp creases, body kits, or awkward aftermarket panels, this is the stage where many owners prefer to hand the job over. Prime Shine Hand Car Wash offers cut and polish as part of its exterior correction work, and more detailed owners often check the hand car wax and polish service when they want the finish corrected without guessing at paint depth.
Choosing the right compound and polish for your paint condition
The wrong product choice wastes time, but the wrong level of aggression can remove more clear coat than you meant to take. Good correction work starts with the least aggressive product that still moves the defect. If it leaves the finish looking cleaner but not clear, step up once, then inspect again.
Match the defect to the product
A cutting compound is for more visible marring, heavier haze, or defects that need material removal rather than cosmetic glossing. A finishing polish is for refining the surface after cutting, or for lighter paint that only needs a cleaner, sharper look. Pad choice changes the result just as much as the liquid, because a firmer pad can increase cut while a softer one can clean up haze without digging further into the paint.
That’s why a one-step approach sometimes works and sometimes doesn’t. A car with light swirls and decent paint condition may only need a careful polish. A neglected finish with oxidation or deeper marring may need a two-stage correction, but only if the clear coat has enough room left to justify it.
| Compound and Polish Selection Guide | |||
|---|---|---|---|
| Defect Level | Recommended Product | Pad Type | Expected Outcome |
| Light swirls and haze | Finishing polish | Soft finishing pad | Improved gloss and reduced faint marring |
| Moderate swirls | Light compound, then polish | Medium pad, then soft pad | Noticeable clarity improvement |
| Heavier defects | Cutting compound, then polish | Firm cutting pad, then finishing pad | Stronger correction with more refinement needed |
Clean pads, inspect often, don’t chase perfection blindly
A contaminated pad can reintroduce the same swirl pattern you’re trying to remove. Replace or clean pads between sections if they’re loading up with spent residue, and check the finish after each pass under good light. If the correction is already good enough for the car’s age and purpose, stop there.
The trade-off is paint preservation. Some cars are better left with a lighter polish and protection than pushed through a heavier correction just to remove every trace of marking. That’s especially true for vehicles being prepped for resale or return, where a stable, glossy finish often matters more than chasing a perfect but thinner result.
If you’re comparing product types and maintenance finish options, this hand wax and polish page is relevant to the lighter end of that spectrum.
Talk to a Paint Correction Expert
Protecting Your Finished Paint for the Long Term
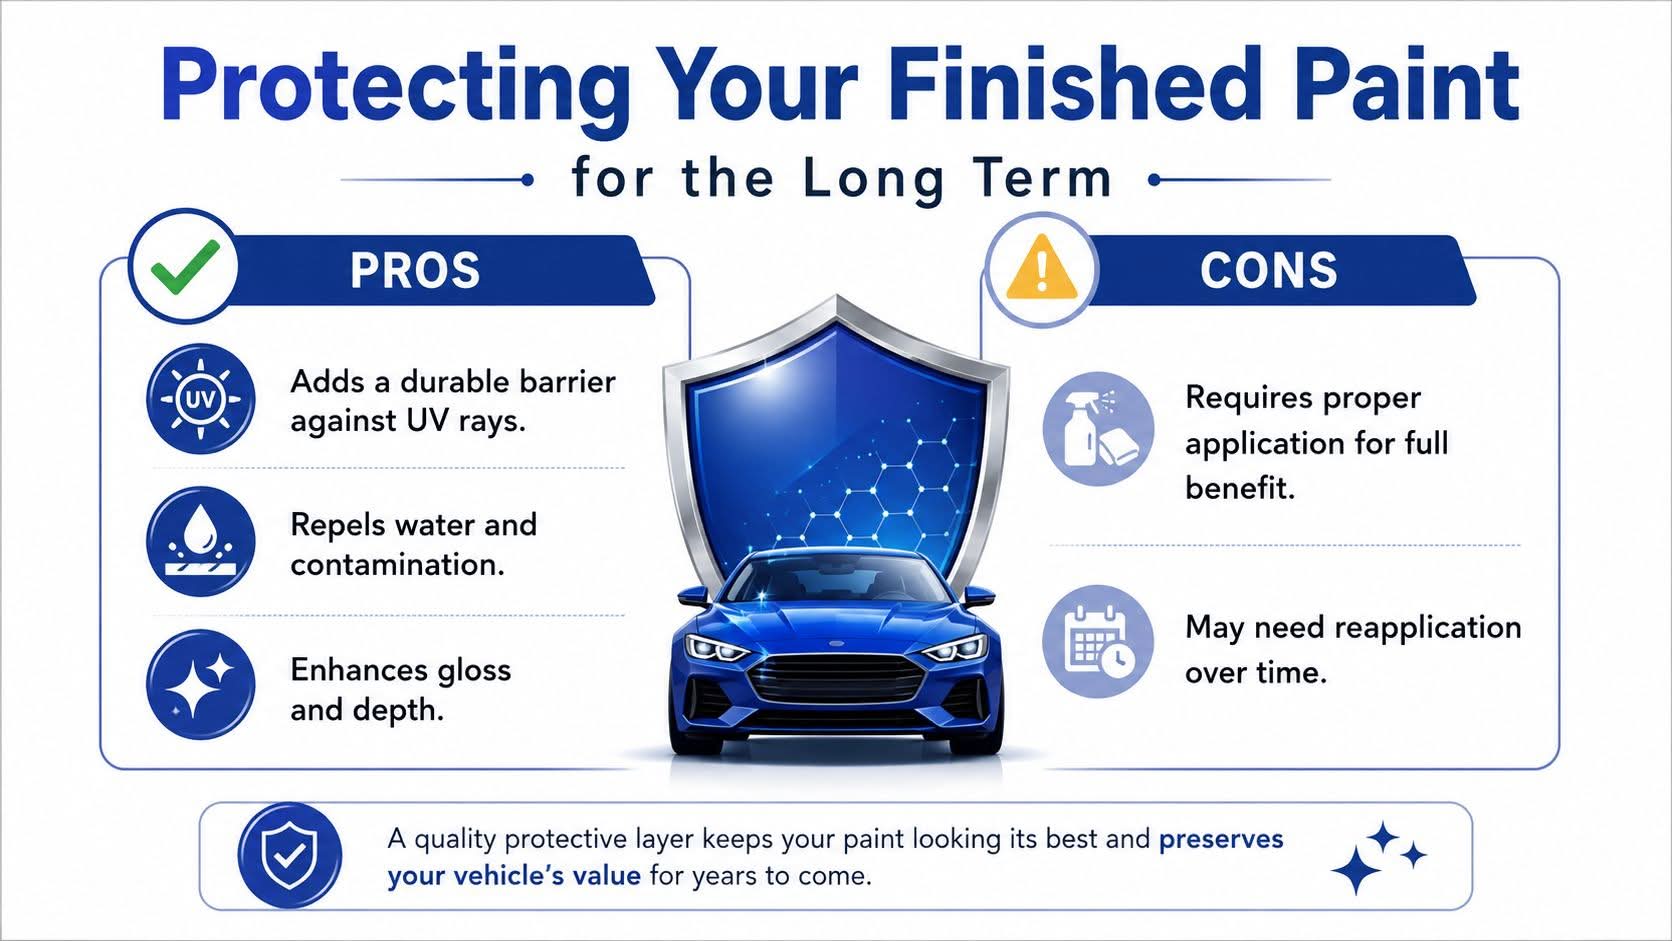
A freshly corrected surface is exposed. The cutting stage removes a fine layer of clear coat, so the finish needs protection against UV, contamination, and the daily wear that makes paint look tired again. Without that follow-up layer, the work you just did starts fading faster than it should.
Protection is part of correction, not an optional extra
Wax can still make sense for owners who want a simpler, traditional finish and don’t mind more frequent upkeep. Sealants sit in the middle, giving a cleaner protective layer with less fuss than a full coating system. Ceramic coating is the more durable direction when you want the correction to hold its look longer and you’re willing to do the prep properly.
The key is that the surface has to be right before anything is applied. Any residue left after polishing can interfere with bonding, so the paint should be clean, dry, and fully inspected before protection goes on. Once it’s on, wash habits matter. A gentle hand wash preserves the finish far better than rough contact or dirty wash media.
Choose the protection to match your maintenance habit
If you enjoy regular washing and want a classic finish, wax is still workable. If you want stronger water behaviour and longer-term paint care, ceramic coating fits naturally after a cut and polish because it locks in the refinement you’ve already paid for with labour. It’s not a magic shield, but it does make maintenance less tedious when applied correctly.
A practical detailer always thinks about the next wash, not just the current shine. If your routine is inconsistent, the most advanced protection won’t save a poorly maintained surface. If your routine is disciplined, even a straightforward protective layer can keep the car looking clean and crisp for longer.
| Paint Protection Options Compared | |||
|---|---|---|---|
| Protection Type | Durability | Application Difficulty | Best For |
| Wax | Lower, more frequent upkeep | Lower | Simple gloss and short-term maintenance |
| Sealant | Moderate | Moderate | Balanced protection and convenience |
| Ceramic coating | Higher, with careful application | Higher | Owners who want longer-lasting protection after correction |
For drivers considering a coated finish after correction, this ceramic coating guide fits naturally with the same workflow.
Protect Your Paint After Correction
When to Stop DIY and call in a Professional Detailer?
Some paint jobs are too risky to keep attacking at home. Deep scratches, heavy etch marks, thin clear coat, and complicated body shapes can turn a money-saving session into a repair bill. Knowing when to stop is part of being good at cut and polish, not a sign that you’ve failed.
Clear signs the job needs professional hands
If a scratch has gone past surface marring and into the colour coat, machine polishing won’t erase it safely. If the finish has already been corrected multiple times, the remaining clear coat may not leave much margin for another aggressive pass. That’s when a cautious assessment matters more than bravado.
Complex modern cars add another layer of risk. Tight sensor areas, sharp creases, gloss-black trims, and mixed materials all demand careful masking and a steadier hand than a broad, flat panel. Wet sanding also changes the equation entirely, because etch marks that sit too deep for compound need a different approach and more control than most driveway setups can offer.
What to ask before you hand it over
Ask how the paint will be inspected, how the defects will be classified, and whether the job will stop at a lighter correction if that protects the clear coat. A serious detailer should be able to explain whether your car is a one-step candidate, a two-stage correction candidate, or a poor match for aggressive compounding. That conversation tells you more about their process than any glossy result photo.
Prime Shine Hand Car Wash in Westminster offers cut and polish and ceramic coating services in Perth, which makes it a practical option for drivers who’d rather not risk a tricky panel set or a borderline clear coat.

Frequently Asked Questions About Cut and Polish
What should I do around edges, badges, and body lines?
Machines struggle in tight areas because the pad wants a flat, stable surface and those spots don’t give it one. Keep the pad slightly away from sharp edges, use smaller pads where access allows, and hand-polish around emblems and tricky recesses when the risk of contact is too high. That’s the safer answer for curved trim and thin paint on modern panels.
How often can a car be cut and polished?
There isn’t a fixed number that works for every car. The right answer depends on how much clear coat is left, how the car has been maintained, and whether the defects justify removing more material at all. If a lighter polish can achieve the look you want, stopping there preserves more paint for later.
Do polish oils remove defects or just hide them?
Polish oils can make the surface look better by filling or masking fine marks temporarily. That isn’t the same as removing the defect, so the test is how the paint looks after proper wipe-down and inspection under light. If the marking comes back, the correction wasn’t permanent.
When do etch marks need wet sanding?
If the mark is too deep to clear safely with compound, especially when it still shows strongly under magnification, wet sanding may be the right starting point. That’s not a DIY guesswork area. It’s a depth-and-risk decision, and it’s better made before you overwork the panel.
Prime Shine Hand Car Wash in Westminster offers hand washing, cut and polish, and ceramic coating for Perth drivers who want careful paint correction with a clean finish. If your car needs more than a quick gloss boost, visit Prime Shine Hand Car Wash to book a service that matches the paint’s condition and your maintenance goals.