







You’ve just washed the car, the Perth sun hits the bonnet, and the paint that looked fine in the shade turns into a web of fine circles. That’s the moment most owners start searching how to remove swirl marks from car paint without making things worse. The good news is that most swirls sit shallow in the clear coat. The risk is removing more of that finite layer than the defect needs.
Unsure what you’re seeing? Get the paint checked before you polish.
I would treat washing as the first correction step, test the gentlest combination on a small patch, and only step up if the test fails. Heat, dust, and water rules change the routine in Perth, so patience matters as much as product choice.
How Can You Tell Swirl Marks From Deeper Scratches?
Most swirl marks are shallow enough for a finishing polish, but diagnosis decides the route. Guessing leads to either weak results or unnecessary cutting. Swirl correction is established detailing work, not a cosmetic wash add-on. Jobs and Skills Australia identifies approximately 17,200 car detailers nationally, whose work includes polishing, waxing, minor finish repairs, and scratch touch-ups.
Rinse the panel with clean water first so dust doesn’t hide the marks. Then inspect it before any machine touches the paint.
Book a paint inspection if several panels show the same damage.
The light and fingernail checks
- Wash and dry the panel. Grit left on the surface masks fine lines and can add marks during inspection.
- Check in direct sun, then with a torch at a low angle. Swirls appear as fine circular lines that shift as the light moves. Check in shade too, because Perth sun can make marks look worse than they are.
- Run a fingernail across the mark. If it glides past, the defect sits in the clear coat and polishing should work.
- Note a light catch. That points to moderate swirls needing compound and extra passes.
- Treat a firm catch on a straight line as a scratch. Compounding may only fade it partly.
| Defect | What You See | Fingernail Test | First Move |
|---|---|---|---|
| Light swirls | Fine circular haze, visible in direct sun | Nail glides past | Decontaminate, then finishing polish |
| Moderate swirls | Denser network, visible at a low angle | Nail catches lightly | Light cutting compound, then finishing polish |
| Light scratches | Straight lines across the panel | Nail catches clearly | Test a small area with compound before deciding |
| Deep scratches or chips | Colour change or primer visible | Nail catches deeply | Stop and measure paint thickness first |
Stop point: If a scratch reaches primer or bare metal, don’t machine polish it. Measure paint thickness first, because clear coat can’t be put back.
Explore Cut and Polish options
How Do You Wash Without Adding New Swirls?
Washing and correction are separate jobs. Washing removes contamination. Polishing refines the clear coat. Polish over grit and you’ll drag abrasive particles across the panel, creating the marring you’re trying to remove. For a fuller routine, follow this guide to the two-bucket hand wash method that prevents swirls.
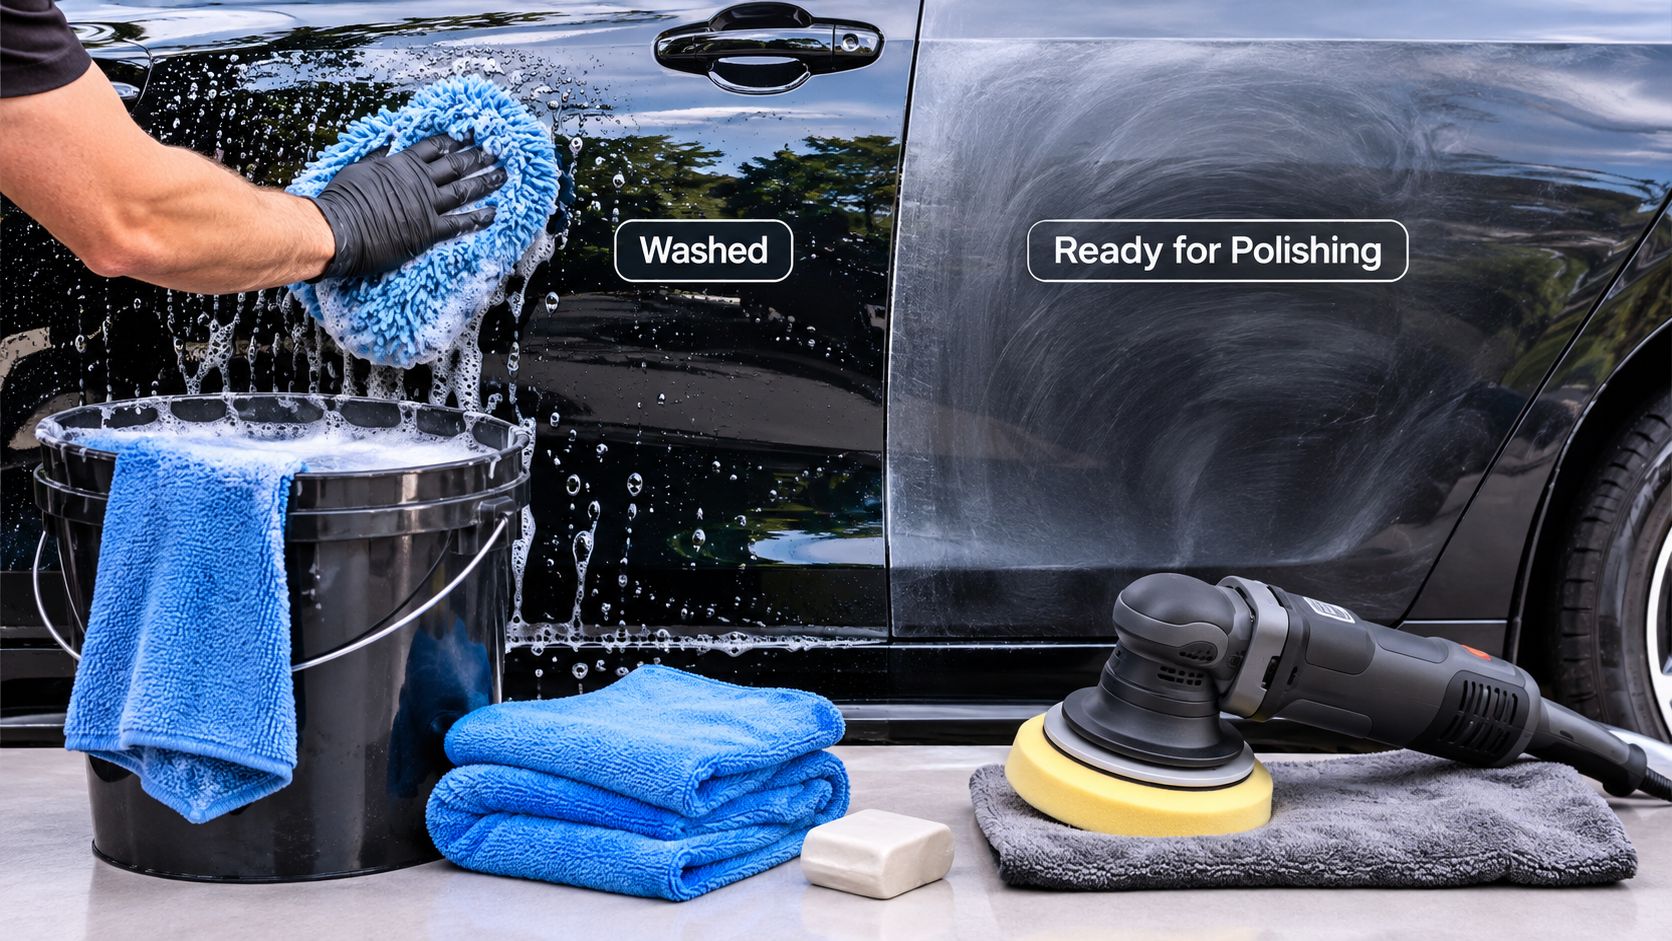
The swirl-safe wash routine
- Rinse the whole car first. Loose dirt needs to lift before any mitt makes contact.
- Wash wheels and lower panels with separate tools. Brake dust and road grit stay off the cleaner upper panels.
- Use two buckets and a clean microfibre mitt. Rinse the mitt in clean water before reloading it with shampoo, so you don’t return grit to the paint.
- Apply iron or fallout remover and rinse. Let it dwell as the label directs. Chemical decontamination loosens bonded particles without scrubbing.
- Clay only where paint still feels rough. Use plenty of lubricant and flat, gentle passes. Claying clean paint adds work and can add marring.
- Dry with a clean microfibre towel or blower. Skip the tired chamois that has been collecting grit in the garage.
Short on water or shade? Book a controlled hand wash instead.
Washing at home isn’t automatically gentler. A poor pre-rinse, limited rinse water, or a contaminated mitt can create more friction than a well-controlled professional wash. Dust, salt, and dried bird droppings shouldn’t be rubbed dry into clear coat.
Check local rules before you start. The Bureau of Meteorology water restrictions service lets you check current restrictions, and a commercial wash or wash bay may be the better option when a bucket wash isn’t permitted. Runoff matters too. Australian water guidance from Icon Water notes NSW advice to use a bucket or trigger-nozzle hose, biodegradable detergent, and a non-abrasive cloth, in a place where soapy water can’t enter stormwater drains, since runoff can carry grease, hydrocarbons, toxic surfactants, and metals including copper, lead, and zinc.
See the swirl-safe hand wash guide
Which Pad and Compound Match Each Defect?
Every step up in cut removes more clear coat, so the pairing should be the lightest one that can finish the job. Pad choice matters as much as compound choice, because a firm pad concentrates pressure while a soft pad spreads it. The same polish on a firm pad cuts noticeably harder.
Before starting, gather a dual-action polisher, foam pads in soft, medium, and firm grades, a pad brush, panel wipe, plastic-safe trim tape, a high-CRI torch, and clean microfibre towels. Having everything ready stops you reaching for a dirty towel mid-job.
Don’t own the gear? Compare the cost before buying pads and compounds.
Pad families in plain terms
- Soft foam finishing pads: For gloss and light haze. They refine rather than cut.
- Medium foam pads: For moderate swirls that survive a finishing polish.
- Firm foam or microfibre cutting pads: For scratches and stubborn defects. They leave haze that must be finished out afterwards.
Compounds differ in abrasive level. A heavier compound levels faster but leaves more refining work, so a finishing polish nearly always comes last to restore gloss. Clean pads with a brush between sections, because a loaded pad drags debris across paint. A pad that stays packed with spent compound behaves like a harsher pad, which is why the brush earns its place on the bench.
Match the pairing to the deepest defect you intend to fix. Light swirls pair with a soft foam finishing pad and finishing polish. Moderate swirls need a medium foam pad and a light cutting compound. Light scratches take a firm foam cutting pad with a medium cut compound. Deep scratches are the only case for a firm cutting pad and heavy cut compound, and only once a thickness check confirms there is clear coat to spend.
If a lighter pairing clears the swirls, don’t step up for the rest of the car. Extra cut buys nothing except thinner paint.
Read the clear-coat correction guide
How Do You Machine Polish Without Burning Through Paint?
The test spot sets the ceiling for the whole job. An RACV guide to removing swirl marks gives a workable starting frame: panel below approximately 30°C, a 50 cm × 50 cm section, about 3 to 5 kg of pressure on a dual-action polisher, movement near 2 to 3 cm/s, and four to six overlapping cross-hatch passes.
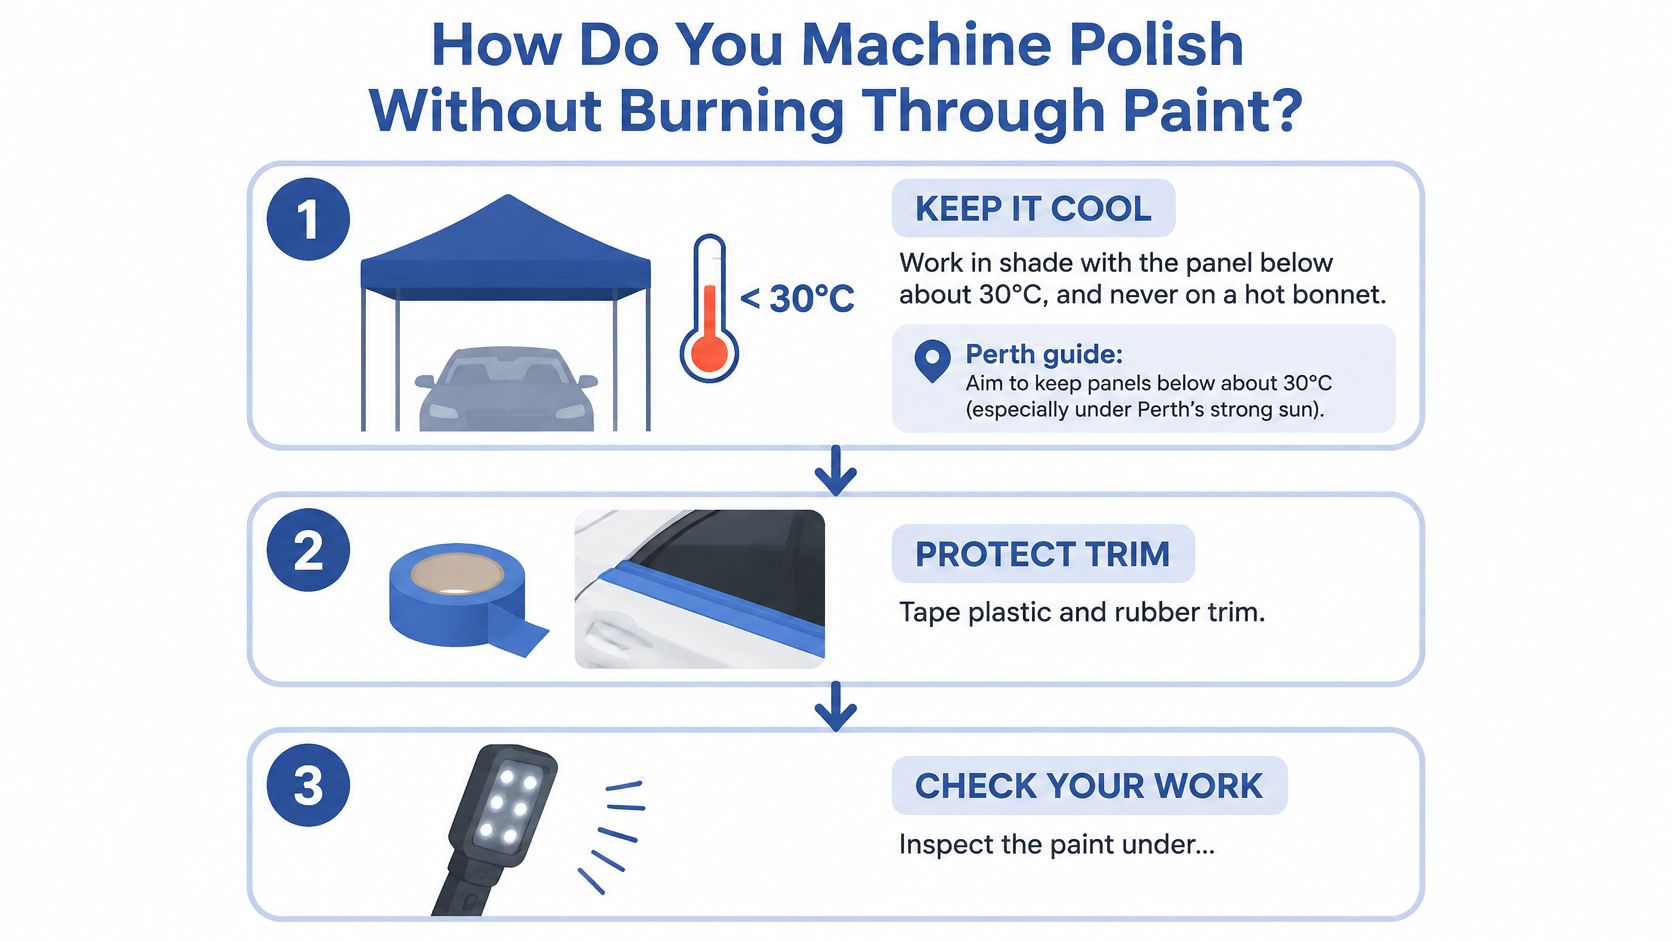
In Perth, the clock matters as much as the machine. Work indoors or in full shade, and favour early morning before a dark bonnet has soaked up the sun. A panel that feels warm to the back of your hand is already too warm, because polish dries early and the pad drags instead of cutting evenly. Tape plastic and rubber trim before starting, since polish stains textured plastic and pads scuff raised edges.
Run the polisher flat and let the pad rotate at its own pace. Pressing harder does not level faster; it just heats the paint. Keep the 3 to 5 kg load consistent, walk the pad across at a steady 2 to 3 cm/s, then wipe with clean microfibre and panel wipe before judging the result. Residue hides what the pass removed, so every verdict happens on a clean panel.
No cool, shaded workspace? Book the correction rather than fighting the heat.
Edges and body lines need the lightest touch because paint is often thinner there and the pad concentrates force on a smaller contact patch. A section is finished when gloss reads even under the light, no haze remains after wiping, and edge colour is unchanged. If a defect survives two measured passes, reassess the pad and compound rather than adding pressure, and apply the same restraint described in this guide to correcting paint without thinning the clear coat.
What Finishing Step Keeps Swirls Away Longer?
A freshly polished panel is bare paint, and it starts collecting fine marring from the very next wash. Sealant, wax or coating gives the corrected clear coat a sacrificial layer, so minor contact marks the protection instead of the paint. Apply it too early, though, and you lock haze or polish oils underneath the finish. Demand for this kind of finish work keeps growing: IBISWorld reports 18,114 motor-vehicle body, paint and interior-repair businesses in 2025, up 28.8% from 2024, across a category broader than correction alone.
Seal only after a clean inspection
Wipe each panel with panel wipe to strip polishing oils, then inspect under controlled light. Perth’s bright sun reveals haze that indoor lighting hides, so if marks remain, go back to refining rather than covering them. Once the finish reads clean and even, apply protection promptly in thin, even layers and buff as the label directs. Bare paint gains nothing by sitting exposed.
| Protection | Typical durability | What it adds |
|---|---|---|
| Carnauba hand wax | A few weeks to a couple of months | Warm gloss; this explainer on liquid car wax and when to use it helps if you're choosing a format |
| Polymer sealant | Several months | Better resistance to washing |
| Ceramic coating | The longest of the three | Easier cleaning and resistance to light swirls |
Want longer-lasting protection? Ask about sealing after your correction.
Perth UV is strong, so reapply sealant on the label schedule and don't wax a hot panel. For upkeep, the pH-neutral two-bucket wash and soft microfibre drying covered in the washing section is exactly what a sealed finish needs. Careless washing can put fine marring back within weeks.
Explore paint protection options
What Goes Wrong and How Do You Fix It?
Start with the least aggressive reset. Hand-wash and dry the suspect area using the rinse method permitted under Perth water rules, clean the pad, then inspect a small patch under light. Dried polish can imitate haze, and grit picked up during correction can leave fresh scratches. If the panel has sat in the Perth sun, move into shade and let it cool before judging the finish; heat makes product dry faster and can make a sound finish look patchy.
| Symptom | Likely Cause | Fix |
|---|---|---|
| Haze or dull film after polishing | Residue left or product dried on the panel | Wipe with panel wipe and re-inspect in shade |
| Holograms or buffer trails | Cut left too strong for the refining stage | Add a controlled finishing pass with a clean, soft pad |
| Swirls still visible after compounding | Cut stayed below the defect depth | Retest the same area with a firmer pad before adding passes |
| Edges look thin or burnt | Clear coat already low or heat concentrated at the edge | Stop polishing, cool the panel and measure paint thickness |
| Fine new scratches after polishing | Grit left on the paint or carried in the pad or towel | Wash and dry the panel, clean or replace the pad, then retest |
Edges looking thin? Stop and get the panel assessed today.
Once the table points to a fix, change one variable and retest the same small area. That keeps the correction controlled and shows which adjustment worked. Set a pass count before polishing, count every pass and stop when you reach it. If the mark remains, reassess the paint before adding more cut.
Edges are the hard stop. If colour or texture changes there, further polishing removes more material. Rest the panel, measure paint thickness and have the area assessed before another pass.
For remaining defects, use the least aggressive combination that improved the test patch, then stop once the finish looks uniform. A mark that stays visible after controlled correction may sit below the clear coat you can safely remove. Preserving paint takes priority over chasing the last visible defect.
Compare professional correction costs
Should You DIY or Book a Professional Cut and Polish?
The deciding factor is how much clear coat you can afford to spend. DIY suits light swirls on one or two panels of a daily driver, provided you have shade, time, and the patience to test the least aggressive pad and compound first. I would book a professional for deep scratches, several panels, repainted or high-value paint, or a car being prepared for sale, where presentation directly affects first impressions.
Cost helps frame the choice. The Mates Rates car detailing cost guide reported Australian paint-correction pricing in 2025 at A$400 to A$600 for a small car, A$500 to A$750 for a medium car, and A$650 to A$900 for a large car or SUV. For local context, see what a Cut and Polish costs in Perth before committing either way.
Preparing a car for sale? Book the correction before you photograph it.
That price buys the sequence, not just machine time. A proper correction runs wash, clay or paint preparation, then cutting and polishing in order, with each step protecting the next. Rushing the preparation is how a correction goes wrong: grit left on the panel gets dragged under the pad and cuts fresh marks into the paint you were trying to save.
| Criteria | DIY Correction | Professional Cut and Polish |
|---|---|---|
| Best for | Light swirls on one or two panels | Deep scratches, several panels or high-value paint |
| Time needed | Hours of your own time plus equipment setup | One booked slot with a set process |
| Main risk | Thinning clear coat through inexperience | Paying for more correction than the defect needs |
| Paint thickness check | Needs a gauge you may not own | Ask before booking if a gauge check is included |
The Prime Shine Cut and Polish follows that same staged order. It starts with an exterior wash, moves to clay bar or paint preparation, then machine cutting and polishing to reduce swirls and light scratches. Cut & Polish restores paint and removes scratches, and every car is hand-washed only, with no machine brushes touching the paint.
Ready to remove the swirls properly? Book your Cut and Polish today.
Whichever route you take, the goal stays the same: remove the least clear coat needed. If you book in, point out where the swirls sit and which panels matter most. Machine time then goes to the defects that need it, rather than a blanket pass over paint that was already healthy. A correction targeted at real defects costs less and leaves more clear coat for the future.
Your next step is simple. Run the nail and light checks on a clean panel. If the defect glides and covers a small area, a careful test patch is reasonable. If it catches, spans several panels, or sits on paint you can’t afford to thin, book a professional Cut and Polish instead.
If your checks point to a professional job, Prime Shine Hand Car Wash in Westminster offers a staged Cut and Polish built around hand washing, paint preparation, and machine polishing to reduce swirls and light scratches. Book your vehicle in through Prime Shine Hand Car Wash and talk through the defect before machine work starts.