







You’re on Wanneroo Road just after the streetlights flicker on. The bulbs still switch on, yet the plastic looks milky and the patch on the bitumen feels shorter than it did last winter. That is a visibility job, not a shine job.
Headlight restoration polish is the removal of external oxidation and haze from a polycarbonate lens. It is not a cosmetic wax, and it does not repair the reflector, the bulb, the wiring, or the aim. If a yellow film wipes dull and stays on the outside, polish can help. If the lamp is wet inside, cracked, or throwing light into oncoming eyes, clearer plastic will not make it safe.
I would start with a daylight look and a torch before you buy compound. The pages below cover when polish clears a lens, the order that avoids cooked plastic, what still has to stay legal, and when you stop and replace the lamp.
Will Headlight Restoration Polish Clear Your Lenses?
Light to moderate external haze usually clears. Deep crazing, heat warp, moisture, and broken plastic need a new assembly. A clearer lens can still dazzle if the beam sits high, so gloss is not a roadworthiness pass.
Stand in daylight, then use a torch at a low angle. Even yellow or milky film that stays on the outer face is oxidation of the hard coat, and that is a polish job. Droplets, a fogged interior, cracks, or a peeling mirror behind the lens are not. Polish cannot reliably repair damage inside a sealed lamp, and it cannot rebuild a degraded reflector.
If the torch shows mist inside the housing, stop buying polish and price a replacement lamp before the next night drive.
The Transport WA vehicle suitability guide expects headlights to operate effectively, show minimal corrosion, avoid cracked or faded lenses, and be correctly focused. It also warns that poorly focused headlights can cause undue glare and blind oncoming drivers. A Perth driver can leave a detail with glossy lenses and still fail that test if aim, corrosion, or an ageing bulb is the fault.
What the torch is telling you
Check the outside first, then the cavity, then the beam on a wall or a quiet street. Internal haze or condensation means the seal has failed. Beam aim is a separate check after any surface work. Replace the assembly when the optical hardware is damaged.
Stop line: If any row below says replace, do not sand. You will spend the afternoon on plastic that cannot throw a legal beam.
The same care you use on paint applies here. A cut and polish removes a controlled amount of clear surface. On a headlamp you are cutting an optic, not chasing gloss for photos.
| What you see | Likely cause | Right action |
|---|---|---|
| Even yellow or milky film on the outside | External oxidation of the polycarbonate hard coat | Wash, polish, then apply a UV sealant |
| Fine scratches you can feel with a fingernail | Surface wear in the outer layer | Wet-sand only as far as needed, then polish and seal |
| Sanding lines or rotary haze left by a past attempt | Uneven abrasion, not new oxidation | Refine with finer abrasive and a plastic-safe compound |
| Droplets, mist, or clouding inside the lens | Moisture in a sealed lamp | Replace the assembly; do not polish |
| Cracked, broken, or badly crazed plastic | Structural lens damage | Replace; polishing will not restore the optic |
| Tarnished or peeling reflector behind clear plastic | Internal optical failure | Inspect and replace if output is impaired |
| Lens looks clear but the beam is high or patchy | Aim, bulb, or geometry, not surface haze | Have focus checked; polish will not fix it |
Match your lamp to that table tonight. If the row says polish and seal, the next section is the safe order. If it says replace, book a fitter, not a compound.
Read the DIY restoration guide
How Do You Polish a Headlight Without Damaging It?
Treat this as an optical-surface repair. Australian Design Rule 46/00 sets performance requirements for headlamps with plastic lenses, including testing under its plastic-lens annex, so clarity and light performance are the end point, not a wet look. Automotive lenses of this type are polycarbonate, and oxidation removal is what a restoration system is built to do. No Australian source publishes a controlled success rate, so do not expect a promised percentage of light back. You should see a visible change the same day on external haze only.
Confirm the lens is plastic before you cut. Restoration kits are specified for polycarbonate, not glass. Heavily crazed, internally clouded, cracked, moisture-damaged, or heat-deformed lenses need replacement.
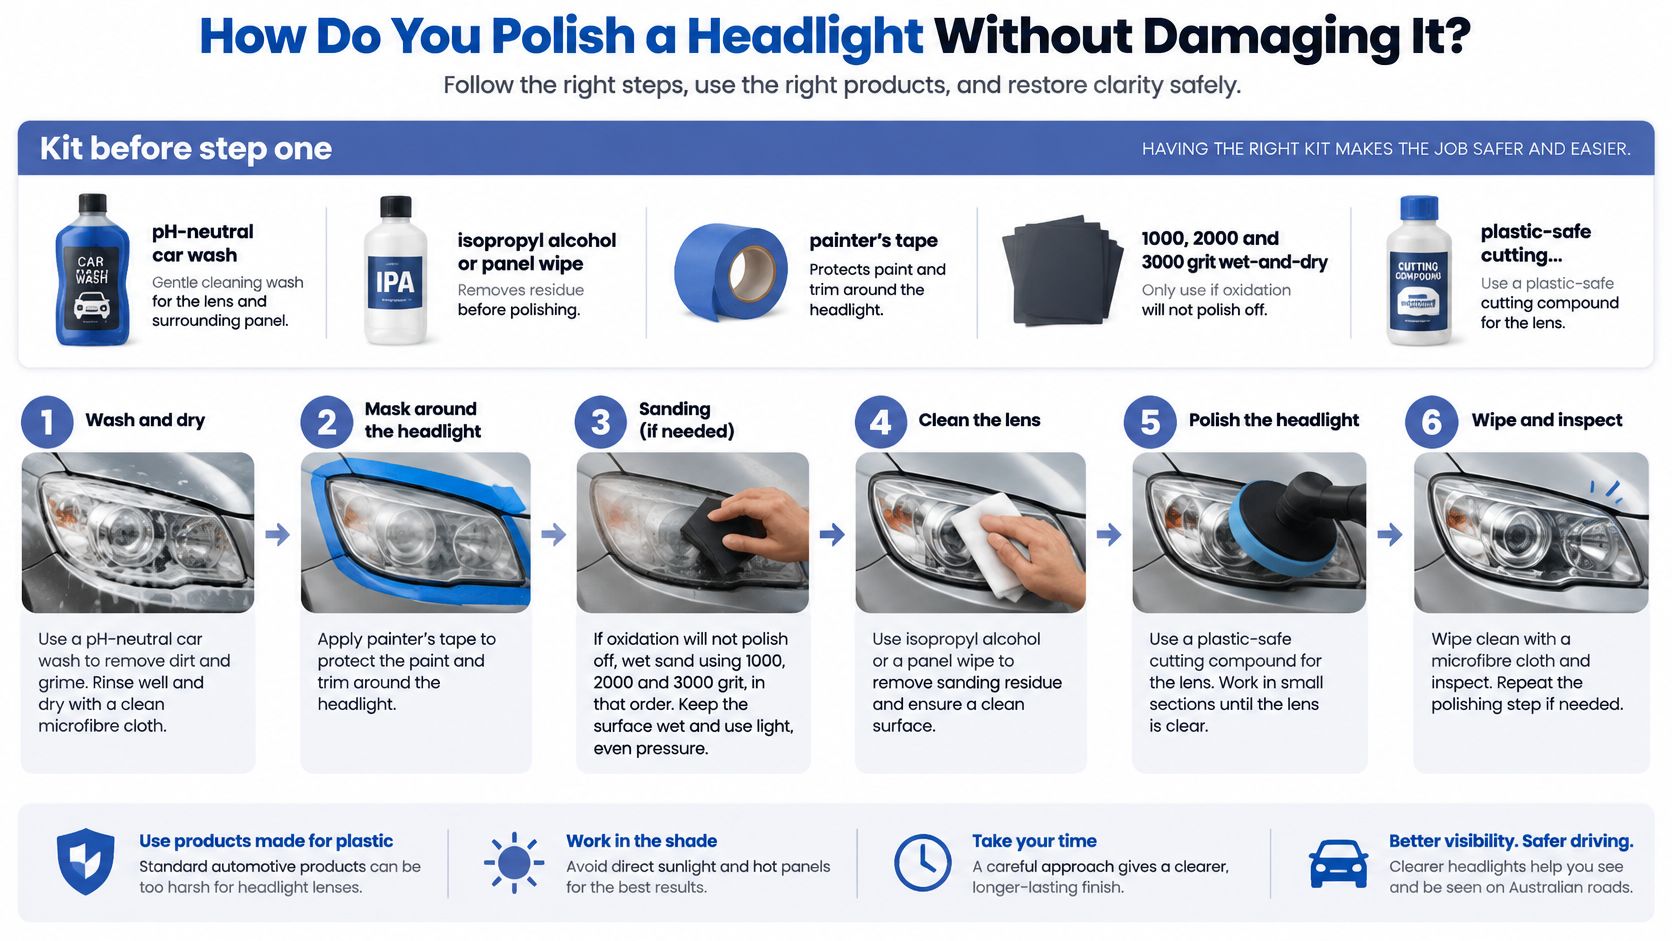
Kit before step one
Lay this out before the polisher comes off the shelf.
- pH-neutral car wash: Lifts road film so grit cannot grind the optic.
- Isopropyl alcohol or a panel wipe: Clears polish oils before the coating.
- Painter’s tape: Masks paint and trim at least a finger-width past the lens.
- 1000, 2000 and 3000 grit wet-and-dry: Only if oxidation will not polish off. Start at the finest grit that cuts the yellow layer.
- Plastic-safe cutting compound: On a foam or wool pad, with a dual-action polisher or a firm hand pad.
- Microfibre towels and a headlight UV sealant: The sealant is the durability step, not an extra.
Work in shade. Direct sun dries the slurry and hides heat in the corners.
No pads and no time this weekend? Leave the bumper taped in your head and have the oxidation removed during a detail instead of rushing a dry sand.
The order that keeps the optic flat
- Wash the lens and the surrounding panel, then wipe with alcohol so loose grit is gone.
- Mask paint, bumper edges, and trim. A slip here is a paint repair, and the logic is the same as paint correction that protects clear coat.
- Inspect again for internal fog. Stop if moisture is inside.
- Wet-sand only if compound will not clear the yellow film. Soak the paper, keep the pad flat, and flood the surface. Move finer until the lens is uniformly matte, with no shiny islands of old coat.
- Machine-polish at low to moderate speed, light pressure, short passes. Check thin corners with the back of your hand. If the plastic feels hot, stop and let it cool.
- Wipe compound residue and degrease until a clean towel stays clean.
- Apply the UV coating and allow it to flash or cure as the tin states. Do not drive through dust while it is open.
- Peel the tape. Inspect under a point light from the driver’s line of sight. You want no sanding tracers, no rotary haze, no compound residue, and no uneven optical distortion.
If step 4 has not gone evenly matte, or a corner is hot, stop. A distorted lens costs more than a workshop hour.
What usually goes wrong
The usual failure is clarity without durability. A headlight restoration kit guide makes the point that removing oxidised material can also thin the original UV-resistant hard coat, so bare polycarbonate yellows again. Finish with a compatible UV sealant only after the oils are gone, and give it the cure the tin asks for. The same guidance warns that non-standard headlamp assemblies or non-ADR-compliant aftermarket globes do not automatically satisfy ADR performance, so polish cannot correct bad beam geometry or the wrong hardware.
Skip household glass polish, toothpaste, acetone, brake cleaner, and unverified solvents. Avoid heavy cutting that leaves edge-through or a ripple. Photograph both lamps in the same light, and note the surface condition, the coating, and the cure time. Restoration improves external clarity. It cannot guarantee roadworthiness where an internal optical or assembly defect remains.
Polishing without a UV coat is a one-season result. The new yellow film is the unprotected plastic you just exposed.
What Must Stay Legal After the Lens Looks Clear?
A glossy lens can still blind the driver coming the other way. That is the risk people skip when they treat headlight restoration polish as a cosmetic tidy.
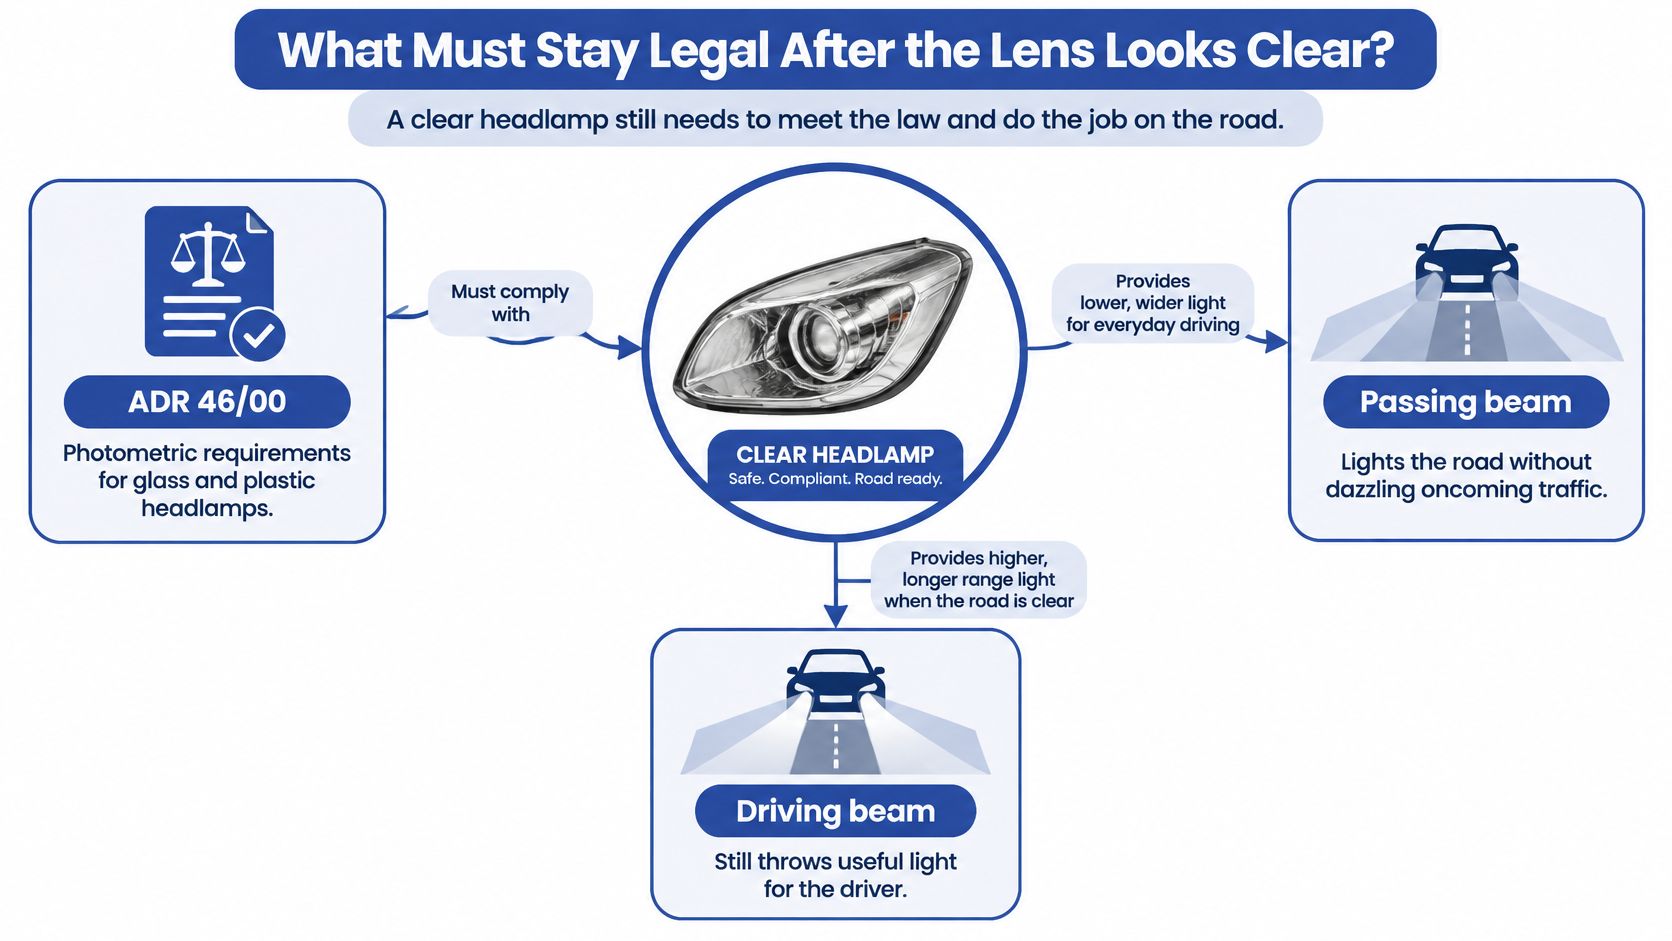
Australian Design Rule 46/00 sets photometric requirements for motor-vehicle headlamps so they give the driver adequate illumination without undue glare for other road users. The rule covers glass and plastic lenses. The passing beam must illuminate adequately without dazzling oncoming traffic, and the driving beam must still provide good illumination. A cloudy, yellowed, heavily oxidised, or scratched lens can spoil that designed pattern even when the bulb and reflector still work. Polish is useful when the defect is only external haze. It is not a certificate that the car meets ADR performance. Australian government guidance also says lamps must be correctly built and adjusted so they give necessary light without dazzling other drivers.
After the lens is clear, book a beam look rather than fitting a brighter globe in the driveway.
Where polish stops and the lamp still has to comply
Restoration can tidy external oxidation. It does not set beam aim, repair wiring, legalise a non-ADR globe, or correct an aftermarket lamp with the wrong geometry. If the lens is badly damaged, internally fogged, cracked, or still throws an abnormal pattern, the next step is replacement or professional testing, not another pad.
Modern LED lamps raise a separate trade-off. ABC reporting on headlight glare notes that LED headlights can produce three to five times the light of older halogen globes, while Australian Design Rules limit low-beam output to 2,000 lumens per lamp unless additional self-levelling equipment is fitted. The same reporting notes that ANCAP does not currently measure headlight glare for new models, even though Australian standards require illumination without dazzle. A brighter bulb is not automatically a safer lamp. Do not sand colour into the lens, and do not coat it with anything that changes tint. Optical clarity should stay inside the lamp’s approved configuration.
The same discipline you use to clean glass the right way applies to the lens face. Film, residue, and a coloured coating all scatter light.
Park 3 to 5 metres from a flat wall at night. Compare the left and right cut-offs. If one beam sits high or the pattern is patchy, book an aim check. Clear plastic supports the lamp’s intended job. Roadworthiness still depends on the whole assembly.
Leave tinted film and LED conversions off the job list. A post-detail aim check is the useful extra, not a brighter unapproved globe.
Check Headlight Restoration Pricing
When Should You Stop and Replace the Lamp?
Say the car is going up for sale photos this weekend, or it is on rideshare nights. One lamp is cracked at the corner. The other beads with condensation after rain. Both look tired in daylight. Only one of those problems is a polish.
The National Heavy Vehicle Regulator’s lighting inspection guidance treats deteriorated or damaged lighting as a potential rejection issue. Reasons for rejection include lights that are obscured or deteriorated, lenses or reflectors dirty or damaged enough to affect clear visibility or consistent intensity, and headlight lenses that are cracked or broken. Tarnished or peeling headlight reflectors are unacceptable where performance is impaired. That document is heavy-vehicle inspection guidance, not a Western Australian car-inspection statute. The distinction still travels. External oxidation is a polish job. Cracks, insecure housings, and reflectors that spoil the beam are not.
Polishable pair or a pair that should come off
A matched pair with even yellow film, solid housings, and a dry interior is worth refining. A cracked corner, water after rain, or a mirror peeling behind clear plastic is a parts job. Sanding the cracked one so the photos look even does not restore the optic, and it can leave you buying the lamp anyway once the surface ripples.
If one lamp is wet or cracked, price the assembly before you mask the good side. Polishing only the clear lamp makes the bad one look worse in photos.
Stop the DIY the moment the plastic fights you.
If sanding has not produced an even matte surface by 1000 grit, if the plastic smells hot or ripples, or if one side stays dull because the damage is behind the lens, put the pads down.
A workshop is the better spend when both lamps need matching clarity, the paint nearby is freshly corrected, you have no dual-action polisher, or the car is due for a pre-sale or fleet check. Ask for notes on condition, the coating used, cure time, and photos, plus a plain line that clarity is not a roadworthy guarantee. A lens pair from a parts counter can dwarf a polish. A distorted DIY lens can force that spend anyway, which is the expensive version of saving an afternoon.
Hand a cracked or fogged lamp to a fitter, and keep polish for the oxidised pair that is still dry and intact.
Explore headlight restoration options
Should You Book the Polish With Your Detail?
If the table showed external haze only, and you have tape, a plastic compound, and a UV coat, you can run the numbered steps this weekend and recheck the wall beam that night. If the lenses are cracked, wet inside, or still aimed poorly, skip polish and price a replacement lamp plus an aim check.
For drivers in Westminster and greater Perth who want the oxidation off without risking the bumper, we treat headlight restoration as removal of oxidation and cloudiness, and we add it when you request it on a full detail booking. The Headlight Restoration add-on is $40.00. We work from a single workshop at 9/436 Wanneroo Rd, Westminster, with hand detailing seven days and online date and time selection. Prices can vary with vehicle condition. That add-on is not a claim that the car is certified roadworthy.
Three routes before you spend
| Option | Cost | Use when |
|---|---|---|
| Headlight Restoration add-on | $40.00 | Oxidised lenses only, booked with a full detail |
| DIY polish kit and pads | Pads, compound and a UV sealant | Light external haze and every step can be followed |
| Replacement lamp assembly | Parts-counter price for the housing | Cracked, fogged or peeling reflector |
The add-on suits a pair that is only oxidised, done while the rest of the car is already in for a detail. A home kit suits light external haze when you will mask, keep the plastic cool, and seal it. A replacement assembly is the honest buy once the lens is cracked, fogged, or the reflector is peeling. Mixing those routes is how people sand a wet lamp and still pay for a new one.
What to book around that add-on sits in our hand car detailing guide for Perth. Request headlight restoration on the full detail if both lenses are only oxidised. Take a cracked or fogged lamp to a fitter first.
Book the $40.00 add-on with the detail when both lenses are only oxidised. If either lamp is cracked or fogged, see a fitter before you book the polish.
Prime Shine Hand Car Wash removes oxidation and cloudiness from headlights as part of careful hand detailing, with a clear limit: we restore the outer lens, and we do not treat gloss as a roadworthy certificate. If your plastic is only yellowed on the outside, add headlight restoration when you book a full detail at our Westminster workshop. Visit Prime Shine Hand Car Wash to choose a date and time.